In this chapter we will go step-by-step from the most basic Empress Report Writer commands to producing complete reports. For the report data we shall use a database called repairs, with a number of different tables in it. The database contains employee records in a table called personnel, customer records in customers, records of automobile repair jobs in jobs, rates charged for the various job types in rates, and records of employees' work hours in hours.
Note
Please remember that hours is an Empress keyword; therefore, to create the table, enclose hours in quotes. Similarly, the attribute hours must be enclosed in quotes.
The structure of each of the tables and the data in them are given in Chapter 3 "Sample Database" of this manual. You will need this database in order to work through the following examples, so create the database using the information provided. For details on creating a database, consult the Empress SQL User's Guide manual.
When a repair job comes in, it is assigned a job number and entered into the jobs table, along with the customer number for the customer who brought in the automobile. If the customer is a new one, an entry is made for him in the customers table, and a new number assigned to him. The job is then given to one of the mechanics, who usually does all the work on it.
The mechanic keeps track of the hours he spends on each aspect of the job, and when the job is complete he records it in the hours table, entering his personnel number, the date the job was completed, a brief description of the work, a code for the type of work, and the hours he spent on it. The code is used to determine both the amount billed to the customer and the amount received by the mechanic for the job, the rate of pay being taken from the rates table.
These records are then used to generate customer invoices, weekly time sheets for employees, and reports on the kinds of jobs the garage has been handling.
The simplest report lists the different repair job classifications, sorted alphabetically, and the codes used for each classification. This report is normally thumbtacked above the mechanics' terminal, and the employees read the job code from it for entering into the hours table. The report takes information from the rates table, sorts it, and prints it out centered in the page.
The entire report looks like this:
|
JOB CLASSIFICATIONS AND CODES Job Classification Code
Axles 5
Battery 15
Body work 11
Brakes 12
Carburetor 18
Distributor 20
Doors 1
Exhaust 14
Fenders 4
Ignition/sparks 7
Lights 3
Lubrication 6
Pistons 17
Radiator 19
Shocks 16
Tires 9
Transmission 10
Universal 13
Wheels 8
Windshields 2 |
As the first step in creating the report, we will start with the title, "JOB CLASSIFICATIONS AND CODES". This will illustrate the use of the PRINT statement, the means by which Empress Report Writer produces all its printed output.
Use a system editor to create a file called script containing the following line:
PRINT "JOB CLASSIFICATIONS AND CODES";
This is a typical Empress Report Writer output statement. It consists of a keyword, PRINT, followed by a character string argument enclosed in quotes, and ended by a semicolon.
All Empress Report Writer statements begin with one or more keywords. It is a good idea to end each statement with a semicolon so that it is clearly delimited. Some statements have arguments, and others do not. PRINT statements, like the one above, always have at least one argument, and may have as many as you wish, separated by commas. The arguments may be character strings, values to be printed, or keywords controlling where the other arguments are to be printed on the page.
The PRINT statement above is actually a complete Empress Report Writer report script.
It can be run by the command:
emprepwr script
Run this command at your terminal.
The first thing you will have noticed is that your output vanished off the screen before you had time to look at it properly. Empress Report Writer has a default page length of 66 lines, so the report you just produced consisted of one line of printing followed by 65 blank lines. To overcome this effect while we are building up the report script, edit your file script again and add the following line at the beginning:
LET PAGELENGTH = 10;
This LET statement reduces the page length to 10 lines; LET statements will be discussed in more detail later. Empress Report Writer has a number of special system variables such as PAGELENGTH, PAGEWIDTH, and PAGENUMBER which automatically keep track of things. These will also be discussed later.
Your entire file should now contain the following:
LET PAGELENGTH = 10;
PRINT "JOB CLASSIFICATIONS AND CODES";
Run the script again with the command:
emprepwr script
You should now see the heading "JOB CLASSIFICATIONS AND CODES" as the first line of output, followed by nine blank lines. Note that the heading is left-justified; this is the default for printed output.
Since we want a centered title for the report, we will have to add an appropriate instruction to the PRINT statement. As well as asking for a centered title, however, we must specify the width of the column it is to be centered in. If no width is given as an argument to a PRINT statement, Empress Report Writer assumes it is printing in a column just wide enough to fit the argument. In our example, for instance, Empress Report Writer is printing one column of output 29 characters wide.
Let us center the title in a column 65 characters wide. Edit script again and change the PRINT statement to the following:
PRINT "JOB CLASSIFICATIONS AND CODES" WIDTH 65 CENTER;
Here we have two new keywords, WIDTH and CENTER, both associated with our original title argument. (WIDTH has an argument of its own 65, the width of the column.)
Run the report. You will now have a nicely centered title.
Just for interest, edit script again and change the PRINT statement to:
PRINT "JOB CLASSIFICATIONS AND CODES" WIDTH 65 RIGHT;
Run the report to see the effect of right-justifying an argument within its column, then change your script back to a centered title.
Remember that CENTER and RIGHT do not have any effect unless you specify a WIDTH for the column. If you want to see what happens without a width, edit your script to remove "WIDTH 65" while keeping CENTER, and run it. (Remember to restore the width specification to your script!)
Let us now continue with the next part of the report the headings for the two columns of data. Edit script and change it to:
LET PAGELENGTH = 10;

PRINT "JOB CLASSIFICATIONS AND CODES"
   WIDTH 65 CENTER, NEWLINE;

PRINT "Job Classification          Code" WIDTH 65 CENTER,
   NEWLINE;
The first PRINT statement now instructs Empress Report Writer to go to a new line after printing the first title. The new line request is necessary because Empress Report Writer does not automatically advance a line at the end of a PRINT statement. You may print several things on the same line from several different statements if you need to.
The second line is another straightforward PRINT statement, much like the first. We have requested a new line at the end of this statement because we will need one eventually, and ending PRINT statements with a new line request is a good habit to get into.
Run the report. Your output should look like the following (the lines across the page indicate beginning and end of the report on your screen):
JOB CLASSIFICATIONS AND CODES
Job Classification
Code
For the report, we actually want two blank lines between the title lines. This could be accomplished either by adding two more NEWLINE statements after the first; or by giving the original NEWLINE statement an argument indicating how many line feeds Empress Report Writer should issue before printing (this would be 3); or by adding a NEWLINE statement with an argument to space down the additional lines.
Edit script and add the following line after the first PRINT statement:
NEWLINE 2;
This instructs Empress Report Writer to space two lines and begin printing on the third line, leaving two blank lines between the printed output. The NEWLINE keyword may appear as an argument to a PRINT statement, as well as being a single statement itself. It makes no difference to Empress Report Writer whether your script has:
PRINT "JOB CLASSIFICATIONS AND CODES"
   WIDTH 65 CENTER, NEWLINE;
or
PRINT "JOB CLASSIFICATIONS AND CODES"
   WIDTH 65 CENTER; NEWLINE;
The style you use is a matter of personal taste. However, the results of forgetting a new line command can be very peculiar (we will illustrate this shortly), so it is good practice to develop a script writing style which makes remembering the NEWLINE easier. To this end, we suggest you always include any new line requests at the end of a PRINT statement, rather than as statements by themselves or at the beginning of the next PRINT statement.
Run the report. You should now have the following:
JOB CLASSIFICATIONS AND CODES
Job Classification
Code
Now that we have the titles set up, it is time to get some data for the report. This involves three steps:
Empress Report Writer must know the name of the database from which data is to be retrieved before it can do any retrievals. The database name is kept in the special Empress Report Writer system variable DATABASE. In this example, we will write all system variables in upper case, to distinguish them from attributes or other variables we may create. In your own scripts, however, they may be in upper case, lower case, or any combination of the two.
The simplest way to specify the name of the database (which is called repairs) is by a LET statement, as follows:
LET DATABASE = "repairs";
Edit script and add the above line before any of the others, so that your entire script now consists of:
LET DATABASE = "repairs";

LET PAGELENGTH = 10;
PRINT "JOB CLASSIFICATIONS AND CODES"
   WIDTH 65 CENTER, NEWLINE;
NEWLINE 2;
PRINT "Job Classification          Code"
    WIDTH 65CENTER, NEWLINE;
Data is retrieved by Empress Query Language SELECT statements. For the report, we want all the records from the rates table, sorted alphabetically by job type. rates has three attributes: code, job_type, and rate. We are only interested in job_type and code. Values for these can be retrieved in a single SELECT statement:
SELECT job_type, code FROM rates SORT BY job_type;
Edit script and add this line after the line specifying the database, with blank lines before and after it for readability.
The SELECT statement must be placed after the database is specified, or the database will be unknown and Empress Report Writer will print an error message. However, the SELECT statement must appear before any attempt to use the attribute values retrieved by it.
Your entire script is now:
LET DATABASE = "repairs";
SELECT job_type, code FROM rates SORT BY job_type;
LET PAGELENGTH = 10;
PRINT "JOB CLASSIFICATIONS AND CODES"
   WIDTH 65 CENTER, NEWLINE;
NEWLINE 2;
PRINT "Job Classification          Code"
   WIDTH 65CENTER, NEWLINE;
After the SELECT statement has been added to the report script, the values of the attributes retrieved are available and may be printed out or used in calculations.
For the report, we simply want to print the values of job_type and code for each record, in the proper columns for neatly laid-out output. This is done by the following lines:
FOR EACH RECORD
   PRINT COLUMN 21, job_type, COLUMN 42, code,
     NEWLINE;
END;
This set of statements illustrates a RECORD statement (RECORD statements are a class of FOR statements). It is identified by the keywords for each record, and any statements following these will be executed for each record retrieved, until the keyword END is encountered. In this example, there is only a single PRINT statement within the body of the RECORD statement. Empress Report Writer prints the current value of the two attributes job_type and code for each record processed.
The new keyword COLUMN, which takes one argument, appears in the PRINT statement. It instructs Empress Report Writer to move across the line to the given column, and start printing in that column.arguments
Thus, the PRINT statement above has five arguments separated by commas: three print commands (the COLUMN and NEWLINE commands) and two attributes (job_type and code).
How do you decide where each column should begin? If a report is to be printed on a special form, you will usually know how many columns fit across it, and can count off where fields start and end. For a free-form report like this example, take a rough guess and then correct the layout by trial and error.
Edit script and add the RECORD statement to its end, with a blank line before it for readability. You will also need to leave a blank line in the output between the column headings and the data in the output. Add an extra NEWLINE statement after the statement which prints the column headings. Your entire script now consists of:
LET DATABASE = "repairs";
SELECT job_type, code FROM rates SORT BY job_type;
LET PAGELENGTH = 10;
PRINT "JOB CLASSIFICATIONS AND CODES"
   WIDTH 65 CENTER, NEWLINE;
NEWLINE 2;
PRINT "Job Classification          Code" WIDTH 65 CENTER,
   NEWLINE;
NEWLINE;
FOR EACH RECORD
   PRINT COLUMN 21, job_type, COLUMN 42, code,
   NEWLINE;
END;
Run the report. You should see the following:
|
JOB CLASSIFICATIONS AND CODES Job Classification Code
Axles 5
Battery 15
Body work 11
Brakes 12
Carburetor 18
Distributor 20
Doors 1
Exhaust 14
Fenders 4
Ignition/sparks 7
Lights 3
Lubrication 6
Pistons 17
Radiator 19
Shocks 16
Tires 9
Transmission 10
Universal 13
Wheels 8
Windshields 2 |
Your report now prints three 10-line report pages, with no white space at the page breaks, and once more runs off the screen. Note that the last page is padded up to its full length of 10 lines with five blank lines.
As an example of the sort of things that happen when you leave out new line requests, edit script and remove the NEWLINE from the final PRINT statement. Your script is now:
LET DATABASE = "repairs";
LET PAGELENGTH = 10;

SELECT job_type, code FROM rates SORT BY job_type;

LET PAGELENGTH = 20;
PRINT "JOB CLASSIFICATIONS AND CODES"
   WIDTH 65 CENTER, NEWLINE;
NEWLINE 2;
PRINT "Job Classification           Code" WIDTH 65
   CENTER, NEWLINE;
NEWLINE;

FOR EACH RECORD
   PRINT COLUMN 21, job_type, COLUMN 42, code;
END;
Run the report. On your screen you will see the titles printed, then lots of error messages complaining that you are attempting to overwrite the previous field, and finally all the lines of the report printed on top of each other. Empress Report Writer produces error messages when two printing requests overlap unless the special keyword OVERPRINT is used.
OVERPRINT causes printing to go back to the beginning of the line very handy for underlining things. Edit script and put the NEWLINE back in, then change the line printing the first title as follows:
PRINT "JOB CLASSIFICATIONS AND CODES"
   WIDTH 65 CENTER OVERPRINT,
   "_____________________________"
   WIDTH 65 CENTER, NEWLINE;
Run the report. On your screen you will see first the title printed, then the underscores printed over them, so that only the underscores will remain on the screen. When printed on paper this will underline the title neatly as expected. If you are designing a report with underlining which is to be viewed on a screen as well as printed, you should print the underscores first and then the words to be underlined. This leaves the words visible.
The report is almost complete, all we need now is a few extra lines at the top of the page, to place the report nicely in the page and to reset the page length for paper output, rather than viewing the report on the terminal screen.
Edit script and add a "NEWLINE 12;" statement before the report title. Also remove the page length specification.
As our last touch, we will add a comment at the beginning of the script to say what the script does. Any text between "/*" and "*/" in an Empress Report Writer script is treated as a comment by Empress Report Writer, and ignored. A comment need not be a single line; it may be several lines long.
Add the following line to the beginning of script:
/* List of job classifications and codes */
The script is now complete, and should look like this:
/* List of job classifications and codes */

LET DATABASE = "repairs";

SELECT job_type, code FROM rates SORT BY job_type;

NEWLINE 12;
PRINT "JOB CLASSIFICATIONS AND CODES"
   WIDTH 65 CENTER, OVERPRINT;
   "_____________________________"
   WIDTH 65 CENTER, NEWLINE;
NEWLINE 2;
PRINT "Job Classification          Code" WIDTH 65
   CENTER, NEWLINE;
NEWLINE;

FOR EACH RECORD
   PRINT COLUMN 21, job_type, COLUMN 42, code,
NEWLINE;
END;
The second report is a bit more complex than the first. It produces a summary of income grouped by job type over a given time period, taking information from the hours and rates tables. The rate of pay for employees, and hence the amount billed to the customer for each job, depends on the job type. Customers are billed at 1.5 times the rate paid to mechanics, so a separate table of charges to customers is not required. This report is used to check how business is doing, and see what kinds of repair jobs are most profitable. It is shown below:
The report and column headings for the second report are very similar to those for the first, so we can get them set up very quickly. We will give this script an initial page length of 23 lines (one screenful), and add a comment at the beginning to say what the report is about.
Edit a new file, script.2, containing the following:
/* Weekly summary of income by repair job type */

LET PAGELENGTH = 23;
LET DATABASE = "repairs";

PRINT COLUMN 16, "SUMMARY OF INCOME BY JOB",
   "TYPE, FEB 28 - MARCH 5 1992", NEWLINE 3;
PRINT COLUMN 25, "Job Type          Income", NEWLINE;
PRINT COLUMN 25, ,"-------------------------"
   NEWLINE 2;
The first PRINT statement illustrates splitting a single statement over two lines in a script.
For this report we need to join the hours and rates tables, retrieving the hours spent on each job type from the hours table and the basic charging rate for each job type from the rates table, for the proper time period. For each repair job done, there is an entry in the hours table which includes the date, the job code, and the hours spent on it. The job types can be identified by the job codes from the rates table. We will be totalling the income for each job type, and therefore must sort the retrieved records by job_type to group the output into clusters of the same job types.
The SELECT statement is:
SELECT job_type, ATTR "hours", rate
   FROM rates, "hours"
   WHERE "hours".code = rates.code
   AND date RANGE "28 Feb 92" TO "5 Mar 92"
   SORT BY job_type;
Edit script.2 and add the SELECT statement after the database specification.
Note
Since hours is also an Empress Report Writer keyword it must be enclosed in quotes, and to distinguish it from an ordinary character string it must be prefaced with the keyword ATTR.
We bill customers at 1.5 times the rate in the rates table, therefore we need to calculate income as the hours times the rate times 1.5 for each job type. We are also going to need the sum of this for each job type, and the overall sum.
These goals are accomplished by defining a derived attribute called income as (hours x rate x 1.5), and then finding the sum of that.
Derived attributes can be treated exactly like real ones. A value exists for them for every record retrieved, and their values may be used to group the records for processing as well. The following statement defines income:
DEFINE income = ATTR "hours" * rate * 1.5;
The "*" is Empress Report Writer's multiplication symbol.
Edit script.2 and add the definition of income right after the SELECT statement. Definitions must always be placed immediately after the SELECT statement yielding the attributes involved in the definition, before any other kinds of statements.
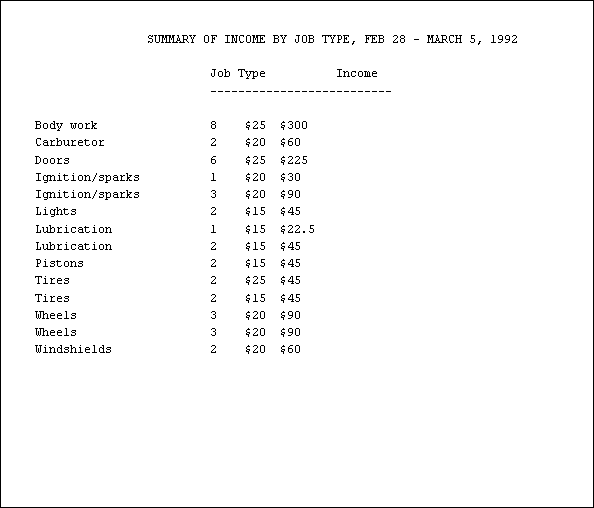
At this point we will print out all the data retrieved, and the value of the derived attribute income, so that we can see what we are dealing with. This will also make the explanation of how these data are organized into groups simpler.
Edit script.2 and add the following RECORD statement at the end:
FOR EACH RECORD
   PRINT job_type, COLUMN 25, ATTR "hours", COLUMN 30,
     "$", rate, COLUMN 35, "$", income, NEWLINE;
END;
The indentation before the PRINT statement is not strictly necessary, since Empress Report Writer ignores white space at the beginning of lines.
It is included to improve the readability of the script, an important point in longer scripts. Your entire script is now:
LET PAGELENGTH = 23;
LET DATABASE = "repairs";

SELECT job_type, ATTR "hours", rate
   FROM rates, "hours"
   WHERE date RANGE "28 Feb 92" TO "5 Mar 92"
   AND "hours".code = rates.code
   SORT BY job_type;

DEFINE income = ATTR "hours" * rate * 1.5;

PRINT COLUMN 16, "SUMMARY OF INCOME BY JOB TYPE",
   "FEB 28 - MARCH 5, 1992", NEWLINE 3;
PRINT COLUMN 25, "Job Type          Income",
   NEWLINE;
PRINT COLUMN 25, "-------------------------", NEWLINE 2;

FOR EACH RECORD
   PRINT job_type, COLUMN 25, ATTR "hours",
      COLUMN 30, "$", rate, COLUMN 35, "$",
      income, NEWLINE;
END;
Run your script, using:
emprepwr script.2
You should see:
This output is not well laid out, but it does show quite clearly that income has come from ten different kinds of job types during this week, and shows the income derived from each separate job.
We now need to sum the income for each different job type that is, group the records by job_type and sum income over each group. For this, we need a GROUP statement, which is similar in structure to a RECORD statement but operates on groups of records rather than individual records.
Edit script.2, remove the entire RECORD statement from the end, and replace it with the following lines:
FOR EACH GROUP of job_type
   PRINT COLUMN 25, job_type;
   LET total = SUM OF income;PRINT COLUMN 43, total PICTURE "$FFF9V.99"
      WIDTH 8 RIGHT, NEWLINE;
END;
A GROUP statement is identified by the keywords FOR EACH GROUP OF, followed by the name of an attribute or a derived attribute, and is terminated by the END keyword. Within this GROUP statement we have a PRINT statement to output the job type, a LET statement to sum the income, and another PRINT statement to output the sum, using a specified picture to format the dollar amount.
PICTURE is a keyword which tells Empress Report Writer to use a picture to print the preceding item in the PRINT statement.
The picture is always enclosed in quotes. This particular picture format prints a dollar sign, at least one and up to four digits, a decimal point, and two more digits. The V indicates the position of the decimal point in the values Empress Report Writer receives. The F print a digit if one is present, and nothing if it is not. The 9 forces a digit to be printed, printing a zero if there is no number to fill that place. Hence, the dollar amount 1234.56 prints as $1234.56, 123.45 prints as $123.45, 1.23 as $1.23, .23 as $0.23, and 12 as $12.00. The column is right-justified to align the amounts properly.
We have used LET statements several times before. They are identified by the keyword LET, and give a value to a variable, which is basically a named place to store a value, either numeric or character. If the variable does not already exist, it is created. If it already has a value, the old value is replaced.
Any expression which results in a numeric value, such as 4+3-2, or 27/3, including calculations on attribute values or derived attribute values (amount/2, hours * rate), may be assigned to a variable. Character strings, enclosed in quotes, may also be stored as variables for example, the whole title of the report could be stored in a variable called title by the LET statement:
LET title = "SUMMARY OF INCOME BY JOB TYPE", concat"
   FEB 28 - MARCH 5 1992";
Wherever a variable name appears in a PRINT statement, the current value of the variable will be printed.
The LET statement in our current report sums income and stores it in the variable total. This brings us to another topic: built-in functions and arithmetic.
Empress Report Writer allows all the normal arithmetic operations in calculations: addition (+), subtraction (-), multiplication (*), and division (/). As well, there is a remainder operation (%) for example, 9%4 is 1, and 27%12 is 3.
There is a second group of operations which may be performed on attributes or derived attributes. These are aggregate functions (functions that work on groups of records): SUM, AVG, COUNT, MIN, and MAX.
These operations cannot be performed on expressions. For example, you cannot say SUM OF (hours * rate * 1.5). Instead of expressions, derived attributes are used. You can say SUM OF income once income has been defined as hours * rate * 1.5.
When sum, average, count, maximum, or minimum are used inside a GROUP statement, they operate on all the records for that group. When they are used outside a GROUP statement, they operate on all the records retrieved by the SELECT statement.
Your entire script should now be:
/* Weekly summary of income by repair job type */

LET PAGELENGTH = 23;
LET DATABASE = "repairs";

SELECT job_type, ATTR "hours", rate
   FROM rates, "hours"
   WHERE "hours".code = rates.code
   AND date RANGE "28 Feb 1992" TO "5 Mar 1992"
   SORT BY job_type;

DEFINE income = ATTR "hours" * 1.5 * rate;
PRINT COLUMN 16, "SUMMARY OF INCOME BY JOB TYPE",
   "FEB 28 - MARCH 5 1992", NEWLINE 3;
   PRINT COLUMN 25, "Job Type          Income",
      NEWLINE;
   PRINT COLUMN 25, "-------------------------",
      NEWLINE 2;

FOR EACH GROUP OF job_type
   PRINT COLUMN 25, job_type;
   LET total = SUM OF income;PRINT COLUMN 43, total PICTURE "$FFF9V.99"
      WIDTH 8 RIGHT, NEWLINE;
END;
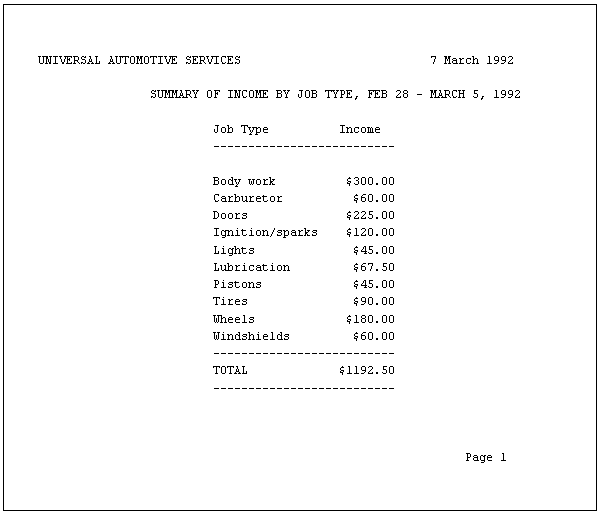
Run your report. You should see:

The only things we are missing now are the overall total and the titles at the top and bottom of the page.
First, the overall total. Edit script.2 again and add the following lines to the end:
PRINT COLUMN 25, "--------------------",
   NEWLINE;
PRINT COLUMN 25, "TOTAL", COLUMN 43, SUM OF income
   PICTURE "$FFF9V.99" WIDTH 8 RIGHT, NEWLINE;
PRINT COLUMN 25, "--------------------",
   NEWLINE;
Note that SUM OF income will now apply to all the records retrieved, since it is outside the GROUP statement.
Run the report again. You now have:

All we need now are headings at the top of the page with the date, and the page number at the bottom of the page. We will also eventually need to reset the page length properly for paper output, rather than viewing the report on the terminal screen. For now, however, we will keep the shorter page length to show the effect of adding a header and footer more clearly.
Headers and footers are groups of lines which Empress Report Writer prints at the top or bottom of every page in a report, respectively. The ones for the report are specified as follows:
HEADER
   NEWLINE 2;
      PRINT "Universal Automotive Services", COLUMN 66,
         TODAY, NEWLINE 2;
END;

FOOTER
   NEWLINE 3;
      PRINT COLUMN 72, "Page ", PAGENUMBER, NEWLINE 2;
END;
They are identified by the keywords HEADER or FOOTER, and terminated by the AND keyword.
The header leaves two blank lines (since it begins at the top of the page), prints a title at the left and a date at the right, and leaves one more blank line. The system variable TODAY holds the current date.
If this variable is given as an argument to a PRINT statement, today's date will be printed.
The footer is similar in structure to the header. The number of the current page is kept by Empress Report Writer in the system variable PAGENUMBER.
Edit script.2 and add the header and footer at the beginning of the script. Leave a blank line after them for readability. Your script is now:
/* Weekly summary of income by repair job type */

HEADER
   NEWLINE 2;
   PRINT "Universal Automotive Services",
      COLUMN 66, TODAY, NEWLINE 2;
END;

FOOTER
   NEWLINE 3;
   PRINT COLUMN 72, "Page ", PAGENUMBER,
      NEWLINE 2;
END;

LET PAGELENGTH = 23;
LET DATABASE = "repairs";

SELECT job_type, ATTR "hours", rate
   FROM rates, "hours"
   WHERE date RANGE "28 Feb 1992" TO "5 Mar 1992"
   AND "hours".code = rates.code
   SORT BY job_type;

DEFINE income = ATTR "hours" * 1.5 * rate;

PRINT COLUMN 16, "SUMMARY OF INCOME BY JOB TYPE,"
   "FEB 28 - MARCH 5, 1992",NEWLINE 3;
PRINT COLUMN 25, "Job Type          Income", NEWLINE;
PRINT COLUMN 25, "------------------------", NEWLINE 2;

FOR EACH GROUP OF job_type
   PRINT COLUMN 25, job_type;
   LET total = SUM OF income;
   PRINT COLUMN 43, total PICTURE "$FFF9V.99"
   WIDTH 8 RIGHT, NEWLINE;
END;
PRINT COLUMN 25, "-------------------------", NEWLINE;
PRINT COLUMN 25, "TOTAL", COLUMN 43, SUM OF income
   PICTURE "$FFF9V.99" WIDTH 8 RIGHT, NEWLINE;
PRINT COLUMN 25, "-------------------------", NEWLINE;
Run it again. Your output is:
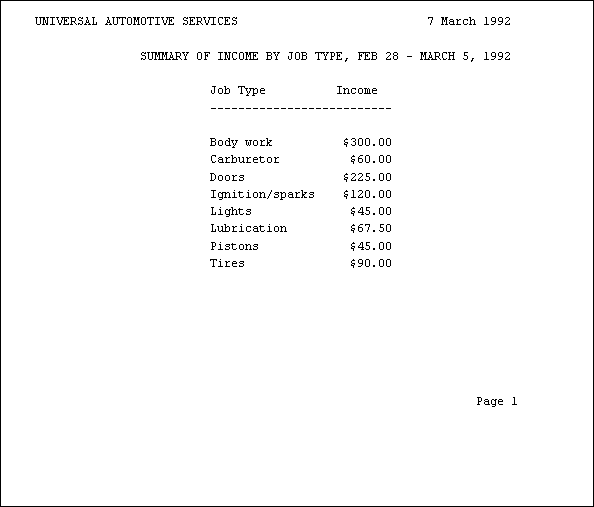

Note that the page length of 23 lines means the entire page, including any header and footer.
Let us put the finishing touches on the second report. These consist of changing the page length back to the normal size for a printed page (Empress Report Writer's default), and altering the format for the date in the header.
The format in which we would like the date printed is March 7, 1992. This is done by specifying a picture format in the PRINT statement, as follows:
PRINT This date picture is fairly simple "aaaaaaaaa" indicates the month should be alphabetic ("mm" is used for a numeric month). The lower case "a" tell Empress Report Writer not to add blanks after the month for short month names. "AAAAAAAAA" would print all the month names 9 characters long (long enough for "September", the longest month name), adding blanks to the end of the short ones. "dd" is a numeric day, with no leading zeros for single-digit days. ("DD" forces a leading zero.) The comma is printed as a literal comma. Finally, "yyyy" prints the year out in full as "1992".
Edit script.2 and make these changes. Your script is now:
/* Weekly summary of income by repair job type */

HEADER
   NEWLINE 2;
   PRINT "Universal Automotive Services",
      COLUMN 66, TODAY PICTURE
      "aaaaaaaaa dd, yyyy", NEWLINE 2;
END;

FOOTER
   NEWLINE 3;
   PRINT COLUMN 72, "Page ", PAGENUMBER,
      NEWLINE 2;
END;

LET DATABASE = "repairs";

SELECT job_type, ATTR "hours", rate
   FROM rates, "hours"
   WHERE date RANGE "28 Feb 1992" TO "5 Mar 1992"
   AND "hours".code = rates.code
   SORT BY job_type;

DEFINE income = ATTR "hours" * 1.5 * rate;

PRINT COLUMN 16, "SUMMARY OF INCOME BY JOB TYPE",
   "FEB 28 - MARCH 5, 1992", NEWLINE 3;

PRINT COLUMN 25, "Job Type          Income",
   NEWLINE;
PRINT COLUMN 25, "-------------------------", NEWLINE 2;

FOR EACH GROUP OF job_type
   PRINT COLUMN 25, job_type;
   LET total = SUM OF income;
   PRINT COLUMN 43, total PICTURE "$FFF9V.99"
   WIDTH 8 RIGHT, NEWLINE;
END;

PRINT COLUMN 25, "-------------------------", NEWLINE;
PRINT COLUMN 25, "TOTAL", COLUMN 43, SUM OF income
   PICTURE "$FFF9V.99" WIDTH 8 RIGHT, NEWLINE;
PRINT COLUMN 25, "-------------------------", NEWLINE;
The second report, although useful, is limited in its current state because the time period it covers is fixed. Every time we wish to run the report, we will have to first edit the script to change the title and the dates in the SELECT statement. This is clearly undesirable.reports:
This problem is overcome by the use of parameters, values passed in to Empress Report Writer at the time the report is run which are substituted for variables in the script. To use parameters for the report, two alterations are necessary. First, Empress Report Writer must be told what parameters to expect. Second, the dates in the title and SELECT statement must be replaced by variables.
We will pass three parameters in for the report, calling them titledate, startdate, and enddate, respectively. They are specified by the following:
PARAMETERS
   CHAR     titledate;
   DATE     startdate;
   DATE     enddate;
END;
The keyword PARAMETERs begins parameter specifications, and END ends them. Each parameter has a type and a name as described in the table below:
Table 8-1: Parameter Types
| Type | Description |
| CHAR | for characters |
| DATE | for date values |
| DECIMAL | for ordinary decimal numbers |
| FLOAT | for exponential numbers |
| INTEGER | for integers |
The name is the variable which will hold the parameter value.
Edit script.2 and add the parameter specifications at the beginning. If parameters are specified, they must always be the first statements in a report script.
To change the report title so that it uses a variable, edit the PRINT statement which produces the title and change it to:
PRINT COLUMN 16, "SUMMARY OF INCOME BY JOB",
   "TYPE, ", titledate, NEWLINE 3;
Finally, edit the SELECT statement to alter the two dates. The SELECT statement should now be:
SELECT job_type, ATTR "hours", rate
   FROM rates, "hours"
   WHERE "hours".code = rates.code
   AND date RANGE var.startdate TO var.enddate
   SORT BY job_type;
Note
Variables used in SELECT statements must have the prefix var. to be interpreted correctly by Empress Report Writer. Also, these variable names cannot contain underscores. This applies only to SELECT statements.
The script is now ready. It should be exactly as follows:
/* Weekly summary of income by repair job type */

PARAMETERS
   CHAR     titledate;
   DATE     startdate;
   DATE     enddate;
END;

LET DATABASE = "repairs";

HEADER
   NEWLINE 2;
   PRINT "Universal Automotive Services", COLUMN 66,
      TODAY PICTURE "aaaaaaaaa dd, yyyy", NEWLINE 2;
END;

FOOTER
   NEWLINE 3;
   PRINT COLUMN 72, "Page ", PAGENUMBER, NEWLINE 2;
END;

SELECT job_type, ATTR "hours", rate
   FROM rates, "hours"
   WHERE date RANGE var.startdate TO var.enddate
   AND "hours".code = rates.code
   SORT BY job_type;

DEFINE income = ATTR "hours" * 1.5 * rate;

PRINT COLUMN 16, "SUMMARY OF INCOME BY JOB TYPE, ",
   titledate, NEWLINE 3;
PRINT COLUMN 25, "Job Type          Income", NEWLINE;
PRINT COLUMN 25, "------------------------",NEWLINE 2;
FOR EACH GROUP OF job_type
   PRINT COLUMN 25, job_type;
   LET total = SUM OF income;
   PRINT COLUMN 43, total PICTURE "$FFF9V.99"
      WIDTH 8 RIGHT, NEWLINE;
END;
PRINT COLUMN 25, "------------------------", NEWLINE;
PRINT COLUMN 25, "TOTAL", COLUMN 43, SUM OF income
   PICTURE "$FFF9V.99" WIDTH 8 RIGHT, NEWLINE;
PRINT COLUMN 25, "------------------------", NEWLINE;
To run this generalized report, use the following:
emprepwr script.2 "FEB 28 - MARCH 5, 1992"
   19920228 19920305
Note that the character string must be enclosed in quotes, and the dates must be expressed either in universal date format, "yyyymmdd", or the format "yymmdd".
This example takes you step-by-step through two quite complex reports, illustrating nested GROUP and RECORD statements, control flow, and some more complex use of variables and picture formats.reports:complex
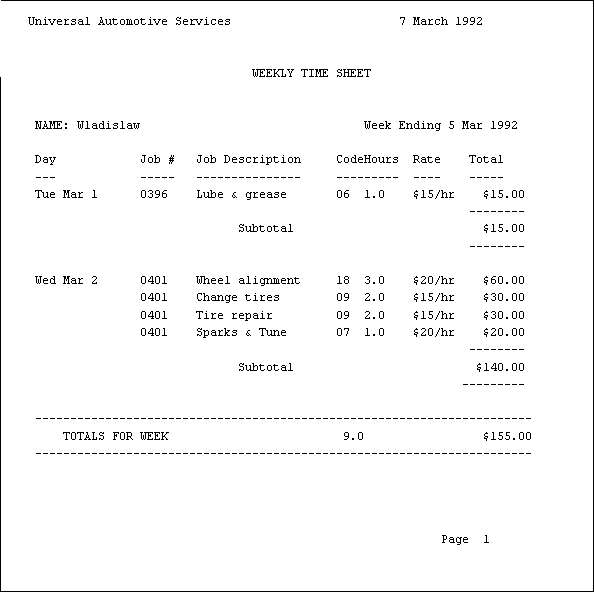
The first report prints out weekly time sheets for employees, and the second prints invoices for customers.
The weekly time sheets list the hours spent by each mechanic on repair jobs for that week. These are used to calculate each employee's wages for the week, and also serve as records of the jobs performed during the week. These reports take information from the hours, rates, and personnel tables.
The date, job description, hours spent, and a calculated income for each job are printed for each employee each day. Subtotals of the amount earned each day and a grand total for the whole week are also printed.
The weekly time sheets for three employees, Kilroy, Mosca, and Wladislaw, are shown on the following pages.
We can get some of the details for the time sheets set up quite quickly. First we will have a comment to identify the report script. Next, we will need to pass in the start and end of the time period which the report covers as parameters, just as we did for the second report. The database is still repairs, so that can be set as well. We will have a page width of 70 characters for this report this will eventually fit everything across the page and give us a report with three-quarter-inch margins on standard paper.
We can set up the header and footer as well. Since the title "WEEKLY TIME SHEET" appears on every page, it can be included in the header.

Edit a file called script.3, containing the following:
/* Weekly time sheets for the employees of the Garage */

PARAMETERS
   DATE     startdate;
   DATE     enddate;
END;

LET DATABASE = "repairs";
LET PAGEWIDTH = 70;
LET PAGELENGTH = 23;

HEADER
   NEWLINE 3;
   PRINT "Universal Automotive Services", COL 53,
      TODAY PICTURE "dd aaaaaaaaa yyyy"
      WIDTH 17 RIGHT, NEWLINE 3;
   PRINT "WEEKLY TIME SHEET" WIDTH 70 CENTER,
      NEWLINE 3;
END;

FOOTER
  NEWLINE 3;
   PRINT COL 63, "Page ", PAGENUMBER PICTURE
      "ZZ", NEWLINE 3;
END;
There is little that is new in this script. We are right-justifying the date in the header, and using a new picture format to print the page number. Z in a picture prints a number in that position, but turns it into a space if it is a leading zero. Thus, page numbers less than 10 will print with a space before the number.
The SELECT statement for this script is much more complex than those for the previous reports. For each repair job in the given time period, we need the job code, the job number, the hours spent on it, its pay rate, when it was done, what it was, and who did it. The dates, hours spent, job descriptions, codes, and numbers come from the hours table. We will join hours with personnel to find the name of the mechanic, and with rates to find the pay rate for each job code. Since we are producing the week's jobs for each mechanic, we need to sort the output by the mechanics' names. Jobs for each day must be kept together, so we sort by date as well, and finally by job number, to keep all the different bits of the same job together.
The SELECT statement is:
SELECT code, ATTR 'job no.', date, ATTR 'hours',
   rate, description, name
   FROM rates, 'hours', personnel
   WHERE date RANGE var.startdate TO var.enddate
   AND 'hours'.code = rates.code
   AND 'hours'.number = personnel.number
   SORT BY name, date, ATTR 'job no.';
Edit script.3 and add the SELECT statement at the end.
We will next need a definition for the amount each mechanic earns, which is the job rate times the hours spent. Edit script.3 and add the following line at the end:
DEFINE amount = ATTR 'hours' * rate;
We need to print the name of each mechanic and a title for the various columns of the report. These will be done within with a GROUP statement grouping on name.
Edit script.3 and add:
FOR EACH GROUP OF name
   PRINT "NAME: ", name, COL 47,
      "Week Ending: ",
      enddate PICTURE "dd aaa yyyy"
      ,NEWLINE 2;
   PRINT "Day            Job #   ","
      Job Description      Code",
      "Hours   Rate    Total", NEWLINE;
PRINT "---            -----   ",
      "---------------      ----",
      "-----   ----    -----", NEWLINE;
At this point we need to set up the daily groupings and print the date. We will then go through each record for that day, printing the relevant information, and finally subtotal the amount earned for that day.
Edit script.3 and add the following:
FOR EACH GROUP OF date
   PRINT date PICTURE "www aaa dd";
   FOR EACH RECORD
      PRINT COL 15, ATTR 'job no.' PICTURE
            "9999"
         COL 23, description, COL 43,
            code PICTURE "99",
         COL 47, ATTR 'hours' PICTURE
            "F9V.9" WIDTH 4 RIGHT,
         COL 54, rate PICTURE "$F9/hr",
            COL 62, amount PICTURE "$FFF9V.99"
            WIDTH 8 RIGHT, NEWLINE;
   END;

   PRINT COL 62, "--------", NEWLINE;
   PRINT COL 29, "Subtotal", COL 62,
      SUM OF amount PICTURE "$FFF9V.99"
       WIDTH 8 RIGHT, NEWLINE;
   PRINT COL 62, "--------", NEWLINE 2;
END;
This is another GROUP statement, nested within the first one. It causes grouping by date within name groups. Note that the SELECT statement that does the retrieval must sort the data in the order in which groups will be nested in the report.
Note the day of the week used in the picture format for the date. Date formats can be extremely flexible. You should refer to Chapter 7.5 for the full list of date pictures available.
Next we print the job number, description, job code, pay rate, hours spent on it, and amount the mechanic earned for every job done that day. This is done in a RECORD statement, nested within the inner GROUP statement.
After the inner GROUP statement (which goes through each day) is finished, we need to work out the grand total of the mechanic's income for the week, and print it out in suitable style. This completes the outer GROUP statement, which will then start on the next mechanic. We want the next time sheet to start on a new page, however, so we must include a NEWPAGE statement just before the end of the GROUP statement. We also want page numbering to restart at 1 for each mechanic, rather than increasing through the whole report, so we set the system variable PAGENUMBER back to 1 just after the NEWPAGE statement.
Edit script.3 and add:
PRINT "----------------------------------------",
   "------------------------------", NEWLINE;
PRINT COL 4, "TOTALS FOR WEEK", COL 44, SUM OF ATTR
   'hours' PICTURE "FF9V.9" WIDTH 7 RIGHT,
   COL 62, SUM OF amount PICTURE "$FFF9V.99"
   WIDTH 8 RIGHT, NEWLINE;
PRINT "----------------------------------------",
   "------------------------------", NEWLINE;
NEWPAGE;
LET PAGENUMBER = 1;
END;
The time sheet report is now complete, except for re-setting the page length to the default. Edit script.3 and remove the page length instruction.
Your script should now appear as shown below. Note the use of indentation to indicate logical groupings in the script (GROUP and RECORD statements, headers and footers), and blank lines to improve readability. These are important in aiding others to understand the purpose of a report script when reading through it, and to help you keep your logic clear when creating the script.
/* Weekly time sheets for the employees of the Garage */

PARAMETERS
   DATE    startdate;
   DATE    enddate;
END;

LET DATABASE = "repairs";
LET PAGEWIDTH = 70;

HEADER
   NEWLINE 3;
   PRINT "Universal Automotive Services", COL 53,
      TODAY PICTURE "dd aaaaaaaaa yyyy"
      WIDTH 17 RIGHT, NEWLINE 3;
   PRINT "WEEKLY TIME SHEET" WIDTH 65 CENTER,
      NEWLINE 3;
   END;

FOOTER
   NEWLINE 3;
   PRINT COL 63, "Page", PAGENUMBER PICTURE
      "ZZ", NEWLINE 3;
END;

SELECT code, ATTR 'job no.', date, ATTR 'hours',rate, description, name
   FROM rates, 'hours', personnel
   WHERE date RANGE var.startdate TO var.enddate
   AND 'hours'.code = rates.code
   AND 'hours'.number = personnel.number
   SORT BY name, date, ATTR 'job no.';

DEFINE amount = ATTR 'hours' * rate;

   FOR EACH GROUP OF name
      PRINT "NAME: ", name, COL 47, "Week Ending:",
      enddate PICTURE "dd aaa yyyy", NEWLINE 2;
   PRINT "Day            Job #   ",
      "Job Description      Code",
      "Hours   Rate    Total", NEWLINE;
   PRINT "---            -----   ",
      "---------------      ----",
      "-----   ----    -----", NEWLINE 2;

   FOR EACH GROUP OF date
      PRINT date PICTURE "www aaa dd";

   FOR EACH RECORD
   PRINT COL 15, ATTR 'job no.' PICTURE "9999",
      COL 23, description, COL 43, code PICTURE "99",
      COL 47, ATTR 'hours' PICTURE "F9V.9"
      WIDTH 4 RIGHT,
      COL 54, rate PICTURE "$F9/hr", COL 62,
      amount PICTURE "$FFF9V.99" WIDTH 8 RIGHT,
   NEWLINE;
   END;

   PRINT COL 62, "--------", NEWLINE;
   PRINT COL 29, "Subtotal", COL 62, SUM OF amount
      PICTURE "$FFF9V.99" WIDTH 8 RIGHT, NEWLINE;
   PRINT COL 62, "--------", NEWLINE 2;
END;

PRINT "----------------------------------------",
   "------------------------------", NEWLINE;
PRINT COL 4, "TOTALS FOR WEEK", COL 44,
   SUM OF ATTR 'hours' PICTURE "FF9V.9" WIDTH 7 RIGHT,
   COL 62, SUM OF amount
   PICTURE "$FFF9V.99" WIDTH 8 RIGHT, NEWLINE;
PRINT "----------------------------------------",
   "------------------------------", NEWLINE;
NEWPAGE;
   LET PAGENUMBER = 1;
END;
Run the report, using
report writer script.3 19920228 19920305
Note how the lines drawn above and below the subtotals and grand totals make them stand out well from the rest of the report.
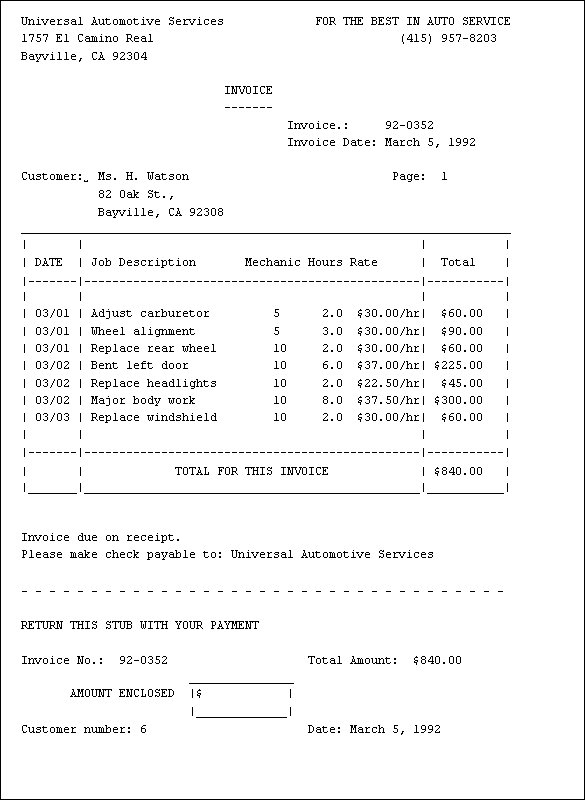
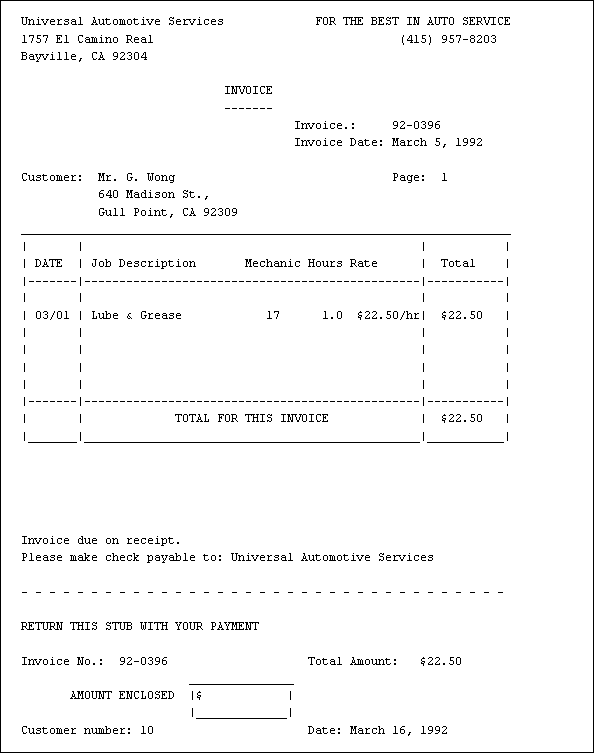
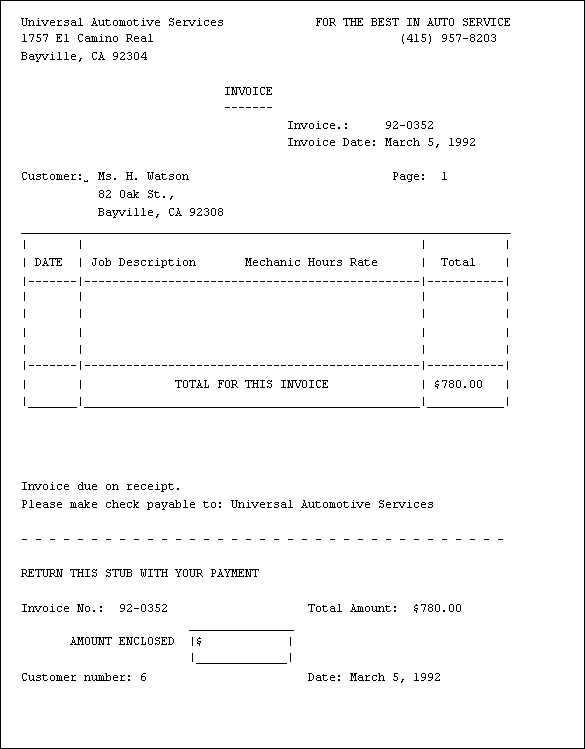
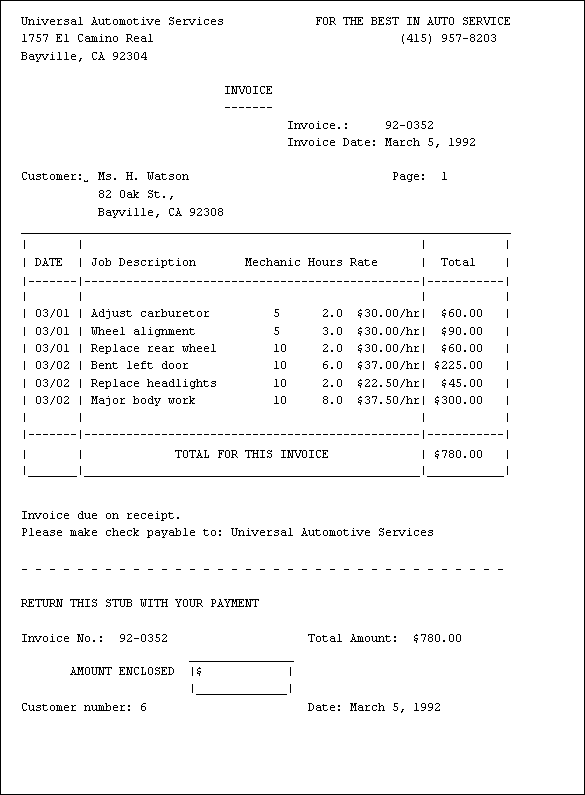
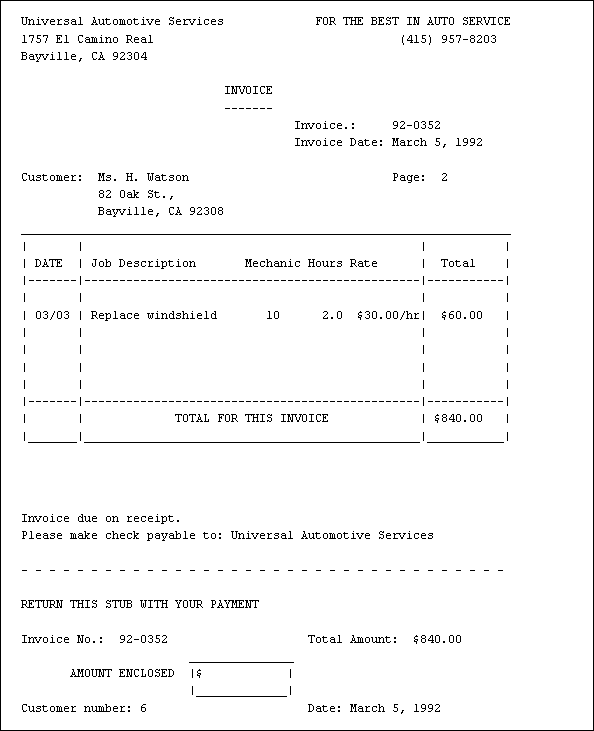
The last report prints out the invoices for customers. For accounting reasons, each job is invoiced separately, so if a customer has brought in his automobile twice in one week, he will get two invoices. Each invoice gives a breakdown of all the separate parts of each job.
The invoice is designed so that the customer's name and address will appear in the lower window of a window envelope when the invoice is folded for mailing, and the address of the garage will appear in the upper window. Invoices for two customers are shown on the next pages.
For the invoices, we again want to pass in the time period it covers as parameters, and set the database to repairs. We will ask for a page width of 75, leaving half-inch margins on standard size paper. We will not define the header and footer yet, since we will want to use attribute values in them. This means they must come after the SELECT statement.
Edit a file called script.4, and add the following:
/* Current Invoices for the Garage */

PARAMETERS
   DATE          startdate;
   DATE          enddate;
END;
LET PAGEWIDTH = 75;
LET DATABASE = "repairs";
We will not set a short page length for this report, since the screen will not be large enough to display an entire invoice.
You will have to use a paging program such as more, pr, or pg when you run it, or use terminal control flow (<Ctrl+S>, <Ctrl+Q>, scrolling, etc.).
This report takes information from the jobs, customers, rates, and hours table, and the SELECT statement is consequently rather complex. We will need each customer's number, name, and address, and the date the job was started. For each part of this job, we need its description, the number of hours spent on it, the rate it is charged at, and the number of the mechanic who did it. Finally, we need the job number, since this is what we use to number invoices. We need to sort our output by job number to keep all the parts of any one job together. We will also restrict the names to Watson and Wong while we are setting up the report script, to avoid excessive amounts of output.
Edit script.4 and add the following SELECT statement to the end:
SELECT name, ATTR 'customer no.', address, 'hours'.date,
   ATTR 'job no.', description, 'hours'.number,
   ATTR 'hours', rate
FROM customers, 'hours', rates, jobs
   WHERE customers.number = jobs.'customer no.'
   AND jobs.'job no.' = 'hours'.'job no.'
   AND 'hours'.code = rates.code
   AND name MATCH "*Wong*|*Watson*"
   AND jobs.date RANGE var.startdate TO var.enddate
SORT BY ATTR 'job no.';
In this case an attribute with a complex name, job no., is also being used in the join condition of the SELECT statement. Here it must be qualified by the table name, rather than the keyword ATTR, to identify the two tables correctly. (Note that the table name may always be used to qualify an attribute name, so that customers.'customer no' is equivalent to 'customer no'. When two attributes have the same name but contain different data, it is essential to qualify them with their table names.)
We are also going to need a defined attribute for the total charged to the customer. For each section of the job we charge at 1.5 times the hours times the rate from the rates table (the rate paid to employees).
Edit script.4 again and add the following definition right after the SELECT statement.
DEFINE total = rate * ATTR 'hours' * 1.5;
We are going to be printing the lines of the box around the invoice items, and will find it convenient to have these long character strings stored as variables so we do not have to continually repeat them. We will also store a picture format for printing dates as a variable which we will use several times.
Edit script.4 and add the following lines. We have written the LET statements for drawing the box on two lines, to keep the long character strings from running over the edge of this manual page.
LET boxtop =
"____________________________________________________________";
LET boxline =
"|       |                                         |        |";
LET boxmid =
"|-------|-----------------------------------------|--------|";
LET boxbase =
"|_______|_________________________________________|________|";
LET boxhead =
"| Date  | Job Description       Mechanic Hours Rate| Total |";
LET datepic = "AAAAAAAAA dd, yyyy";
Let us now set up the header and footer. They are both more complex than the simple header and footer we have used before, but only because they have more information in them. Edit script.4 and add the following at the end:
HEADER
   NEWLINE 4;
   PRINT "Universal Automotive Services",
      COL 42, "FOR THE BEST IN AUTO SERVICE",
     NEWLINE;
   PRINT "1757 El Camino Real", COL 54,
      "(415) 957-8203", NEWLINE;
   PRINT "Bayville, CA 92304", NEWLINE 2;
   PRINT COL 30, "INVOICE", NEWLINE, COL 30,
      "-------", NEWLINE;
END;

FOOTER
   PRINT "Invoice due on receipt.", NEWLINE;
   PRINT "Please make check payable to: ",
      "Universal Automotive Services", NEWLINE 2;
   PRINT "- - - - - - - - - - - - - - - - - -",
      " - - - - - - -", NEWLINE 2;
   PRINT "RETURN THIS STUB WITH YOUR PAYMENT",
      NEWLINE 2;
   PRINT "Invoice No.: 92-0", ATTR 'job no.',
      COL 41, "Total Amount: ", grandtotal
      PICTURE "$FFF9V.99" WIDTH 8 RIGHT, NEWLINE;
   PRINT COL 25, " _____________ ", NEWLINE;
   PRINT COL 8, "AMOUNT ENCLOSED", COL 25,
      "|$            |", NEWLINE;
   PRINT COL 25, "|_____________|", NEWLINE 2;
   PRINT "Customer number: ", ATTR 'customer no.',
      COL 41, "Date: ", TODAY PICTURE datepic,
      NEWLINE;
   NEWLINE 3;
END;
The header really has nothing fancy in it; it just prints out the address on the left, a bit of advertising and a phone number on the right of the page, and the "INVOICE" title.
The footer prints the return stub for the invoice, which we assume will be one page long. It uses the attribute job no. to generate the invoice number, and prints the total amount for the invoice (the variable grandtotal, which will be calculated in the body of the report). It then draws a little box for the customer to indicate how much he has paid, and finally prints the customer number (so our office staff can credit the payment to the right account), and the date on which the bill was printed. Note that we use the variable for the date picture format which we had set up earlier.
Our next step is to set up the GROUP statement which prints out the customer's name and address, the invoice date and number, draws the invoice box, and sums up the amount owing. This is quite straightforward except for address, which is a TEXT data type attribute and must be handled specially.
Edit script.4 again and add the following at the end:
FOR EACH GROUP OF ATTR 'job no.'
   PRINT COL 40, "Invoice No.: 92-0",
      ATTR 'job no.', NEWLINE;
   PRINT COL 40, "Invoice Date: ", TODAY
      PICTURE datepic, NEWLINE 2;
   PRINT "Customer: ", name, COL 54, "Page: ",
      PAGENUMBER, NEWLINE;
   PRINT boxtop, NEWLINE, boxline, NEWLINE,
      boxhead, NEWLINE, boxmid, NEWLINE,
      boxline, NEWLINE;
   PRINT boxline, NEWLINE, boxmid, NEWLINE;
   LET grandtotal = SUM OF total;
   PRINT "|     |     TOTAL FOR THIS INVOICE        |",
      COL 61, grandtotal PICTURE "G$FFF9V.99",
      " |", NEWLINE;
   PRINT boxbase, NEWLINE 3;
   NEWPAGE;
END;
Note how setting variables for the box drawing has made this GROUP statement far simpler to read than it would have been with all the long box strings in the middle of it.
We encounter a new picture format here: G$FFF9V.99. The new part is the G, which forces a space to be printed where the G occurs for every digit which is not printed where an F occurs later in the picture. This provides another way to have a dollar amount of constant width printed, with the dollar sign against the leading digit. For example, G$FFF9V.99 can also be expressed as $FFF9V.99 WIDTH 8 RIGHT.
To print out the address, we need the following statements:
LET temp = address;
WHILE (temp != "")
DO
   PRINT COL 12, temp WIDTH 40 OVERFLOW INTO
   temp, NEWLINE;
END;
NEWLINE;
This construction is known as a WHILE loop.
The phrase "temp != """ following the keyword WHILE is known as a condition; if the test it makes is true, all statements between the DO and the END are executed. Empress Report Writer then returns to the WHILE line, and checks the condition again. As soon as the condition is false, Empress Report Writer skips to the next statement after the END and continues with the rest of the report.
Conditions may test for equality (=), inequality (!=), greater than (>), greater than or equal to (>=), less than (<), or less than or equal to (<=).
Here, we first copy the value of address to a temporary variable, appropriately named temp. (This is done in case we need the address again, because the process of printing out the value will end up with temp as an empty character string.) Then we test to see if there is anything in temp to print. If there is, we print 40 characters of it and a new line command, and then replace the previous contents of temp with whatever remains beyond the first 40 characters. This is done by the phrase OVERFLOW INTO temp. When there is nothing left of temp to print, the loop stops and the NEWLINE after its end is printed.
Edit script.4 again and place the above lines immediately after the line which prints the customer's name.
Let's have a look at how the entire script should appear:
/* Current Invoices for the Garage */

PARAMETERS
   DATE          startdate;
   DATE          enddate;
END;

LET PAGEWIDTH = 75;
LET DATABASE = "repairs";

SELECT name, ATTR 'customer no.', address, 'hours'.date,
   ATTR 'job no.', description, 'hours'.number,
   ATTR 'hours', rate
FROM customers, 'hours', rates, jobs
WHERE customers.number = jobs.'customer no.'
   AND jobs.'job no.' = 'hours'.'job no.'
   AND 'hours'.code = rates.code
   AND name MATCH "*Wong*|*Watson*"
   AND jobs.date RANGE var.startdate TO var.enddate
SORT BY ATTR 'job no.';

DEFINE total = rate * ATTR 'hours' * 1.5;
LET boxtop =
"____________________________________________________________";
LET boxline =
"|       |                                         |        |";
LET boxmid =
"|-------|-----------------------------------------|--------|";
LET boxbase =
"|_______|_________________________________________|________|";
LET boxhead =
"| Date  | Job Description      Mechanic Hours Rate|  Total |";
LET DATEPIC = "AAAAAAAAA dd, yyyy";

HEADER
   NEWLINE 4;
   PRINT "Universal Automotive Services",
      COL 42, "FOR THE BEST IN AUTO SERVICE",
      NEWLINE;
   PRINT "1757 El Camino Real", COL 54, "(415) 957-8203", NEWLINE;
   PRINT "Bayville, CA 92304", NEWLINE 2;
   PRINT COL 30, "INVOICE", NEWLINE, COL 30, "--------", NEWLINE;
   END;

FOOTER
   PRINT "Invoice due on receipt.", NEWLINE;
   PRINT "Please make check payable to: ",
      "Universal Automotive Services",
      NEWLINE 2;
   PRINT "- - - - - - - - - - - - - - - - - -",
      " - - - - - - -", NEWLINE 2;
   PRINT "RETURN THIS STUB WITH YOUR PAYMENT",
      NEWLINE 2;
   PRINT "Invoice No.: 92-0", ATTR 'job no.',
      COL 41, "Total Amount: " grandtotal
      PICTURE "$FFF9V.99" WIDTH 8 RIGHT, NEWLINE;
   PRINT COL 25, "_____________ ", NEWLINE;
   PRINT COL 8, "AMOUNT ENCLOSED", COL 25,
      "|$           |", NEWLINE;
   PRINT COL 25, "|_____________|", NEWLINE 2;
   PRINT "Customer number: ", ATTR 'customer no.',
      COL 41, "Date: ", TODAY PICTURE datepic,
      NEWLINE;
   NEWLINE 3;
END;

FOR EACH GROUP OF ATTR 'job no.'
   PRINT COL 40, "Invoice No.: 92-0", ATTR
      'job no.', NEWLINE;
   PRINT COL 40, "Invoice Date: ", TODAY PICTURE
      datepic, NEWLINE 2;
   PRINT "Customer: ", name, COL 54, "Page: ",
      PAGENUMBER, NEWLINE;
   LET temp = address;
   WHILE (temp != "")
   DO
      PRINT COL 12, temp WIDTH 40 OVERFLOW INTO temp,
         NEWLINE;
   END;
   PRINT boxtop, NEWLINE, boxline, NEWLINE,
      boxhead, NEWLINE, boxmid,NEWLINE,
      boxline, NEWLINE;
   PRINT boxline, NEWLINE, boxmid, NEWLINE;
   LET grandtotal = SUM OF total;
   PRINT "|     | TOTAL FOR THIS INVOICE      |",
      COL 61, grandtotal PICTURE
      "G$FFF9V.99", " |", NEWLINE
   PRINT boxbase, NEWLINE 3;
   NEWPAGE;
   LET PAGENUMBER = 1;
END;
Run the script, using:
emprepwr script.4 19920228 19920305
The report will be much longer than the screen. Remember to pipe the output through a paging program or use terminal control flow.
You should see:
We are getting fairly close to the desired results now. All we need is to print the various details for each job, and we're there. For this, we add a RECORD statement nested within the GROUP statement, just before we print the total and the box base.
Edit script.4 and insert the RECORD statement as follows:
FOR EACH GROUP OF ATTR 'job no.'
   PRINT COL 40, "Invoice No.: 92-0", ATTR 'job no.',
      NEWLINE;
   PRINT COL 40, "Invoice Date: ", TODAY
      PICTURE datepic, NEWLINE 2;
   PRINT "Customer: ", name, COL 54, "Page: ",
      PAGENUMBER, NEWLINE;
   LET temp = address;
   WHILE (temp != "")
   DO
      PRINT COL 12, temp WIDTH 40 OVERFLOW
         INTO temp, NEWLINE;
   END;
   NEWLINE;
   PRINT boxtop, NEWLINE, boxline, NEWLINE,
      boxhead, NEWLINE, boxmid, NEWLINE,
      boxline, NEWLINE;

   FOR EACH RECORD
   PRINT "| ", 'hours'.date PICTURE "MM/DD",
      COL 8, " | ", description,
      COL 34, 'hours'.number WIDTH 8 CENTER,
      COL 44, ATTR 'hours' PICTURE "GF9V.9",
      COL 49, rate * 1.5 PICTURE "G$FF9V.99",
      "/hr |",
      COL 61, total PICTURE "G$FFF9V.99",
      " |", NEWLINE;
END;

   PRINT boxline, NEWLINE, boxmid, NEWLINE;
   LET grandtotal = SUM OF total;
   PRINT "|     |     TOTAL FOR THIS INVOICE   ",]
      "     |", COL 61, grandtotal PICTURE
      "G$FFF9V.99", "  |", NEWLINE;
   PRINT boxbase, NEWLINE 3;
   NEWPAGE;
   LET PAGENUMBER = 1;
END;
Run the report. You should see:

The invoices are now adequate as they stand, but there are two areas in which they can be improved:
What should happen is that the invoice box stops at a given length, with a message that the invoice is continued on the next page, and a proper base to the box is printed. The next page should have the customer information repeated, and a proper top and title for the invoice box. Finally, there should be only one return stub printed per invoice; the first page should just have a plain footer with a bit of advertising in it.
The invoice box is filled out to a constant length by repeating a series of statements which check how far down the page the report has got, and print lines of box sides until a pre-set line number is reached.
This is accomplished by another WHILE loop, as follows:
LET boxend = 39;
WHILE LINENUMBER < boxend
DO
   PRINT boxline, NEWLINE;
END;
LINENUMBER is another Empress Report Writer system variable, which always holds the number of the current report line. It is incremented automatically by Empress Report Writer, so we do not need to do so. boxend is a variable holding the line number at which the box should end. We are using a variable rather than just making this a number so that it is obvious what this number means. We will also use it later when we fix the problem of long invoices not working. It is always a good idea to assign numbers like these to variables, so you only have to change the number in one place if you decide later you would like a different length for the box.
Edit script.4 and put the while loop right after the end of the RECORD statement. Put the "LET boxend = 39" line up at the beginning of the script with the other LET statements; it will be easy to find and change later. Run the script again and note the nice even boxes.
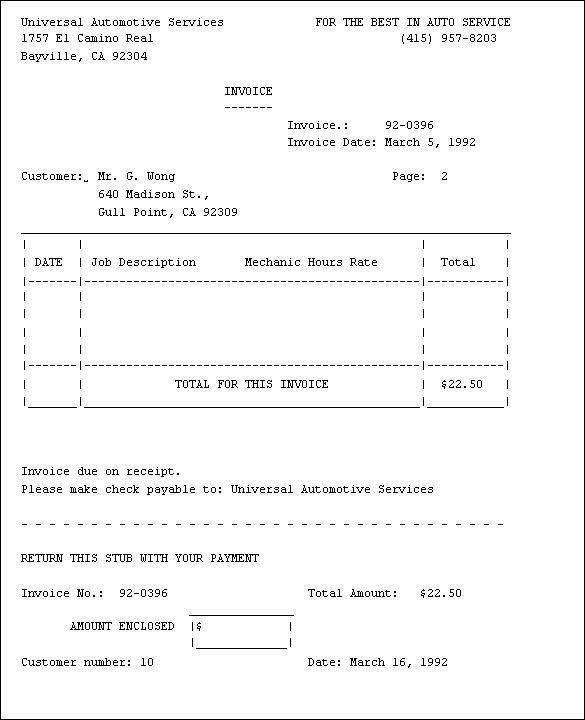
If the invoice is very long (that is, the list of items has got to a given line number), the report should print a message saying the invoice continues on the next page, draw the bottom of the box, put a plain footer on the current page, start a new page, reprint the name, address, invoice date, and invoice number, and then draw a new top for the box.
All this is done by the following statements:
IF LINENUMBER > boxend
   THEN
   USE FOOTER TWO;
   PRINT boxline, NEWLINE;
   PRINT "|     |   CONTINUED ON NEXT PAGE ",
      "     |          |", NEWLINE;
   PRINT boxbase;
   NEWPAGE;
   PRINT COL 40, "Invoice No.: 92-0", ATTR
      'job no.', NEWLINE;
   PRINT COL 40, "Invoice Date: ", enddate
      PICTURE datepic, NEWLINE 2;
   PRINT "Customer: ", name, COL 54, "Page: ",
      PAGENUMBER, NEWLINE;
   LET temp = address;
   WHILE (temp != "")
      DO
      PRINT COL 12, temp WIDTH 40 OVERFLOW
         INTO temp, NEWLINE;
   END;
   NEWLINE;
   PRINT boxtop, NEWLINE, boxline, NEWLINE,
      boxhead, NEWLINE, boxmid, NEWLINE,
      boxline, NEWLINE;
END;
IF followed by a condition allows the statements between the THEN and END to be executed if the condition is true. Unlike a while loop, the statements are only executed once. This provides a branch point in a report script. Before the END of the IF statement you may place the keyword ELSE, followed by one or more statements. These statements are to be executed if the condition is false. For example, the following:
IF amount < 0
   THEN
   PRINT "Account Overdrawn";
ELSE
   PRINT "Amount is: ", amount;
END;
will print the "Account Overdrawn" message if amount is zero or negative, and will print the amount if amount is positive.
If you only want something to happen if the condition is false, you may simply write:
IF condition
   THEN
   ;
ELSE
   statements;
END;
Edit script.4 and put the IF statement just before the end of the RECORD statement.
We now define the footer used to replace the return stub on all but the last page of very long invoices. We have invoked a new footer with the rather cryptic statement "USE FOOTER two" straight after the THEN of the IF statement; this "FOOTER two" must now be defined.
You may have several different headers and footers, labeled as "HEADER one", "FOOTER rightpage", "FOOTER leftpage", etc., and use specific ones through your report by statements saying "USE HEADER one", "USE FOOTER rightpage", and so on. A request to use a new header takes effect on the next page; a request to use a new footer takes effect on the current page (provided there is enough left of the current page to fit the new footer).
Edit script.4 and change the line beginning the footer to:
FOOTER one
Right after the end of this footer add the following:
FOOTER two
   NEWLINE 2;
   PRINT COL 3, "FOR THE BEST IN PARTS AND SERVICE ",
      "UNIVERSAL AUTOMOTIVE SERVICES", NEWLINE 2;
   PRINT COL 15, "1757 El Camino Real, Bayville,",
      "CA 92304", NEWLINE;
   PRINT COL 27, "(415) 957-8203", NEWLINE 3;
END;
Now, just before the final NEWPAGE in the script, add this line:
USE FOOTER one;
Now the return stub footer will be used just before the end of an invoice, and the plain footer will be used on the first pages of any long invoices.
Let us simulate the effect of having a very long invoice by reducing the length of the invoice box. Edit script.4 again and change the line:
LET boxend = 39
to:
LET boxend = 27;
Your script is now:
/* Current Invoices for the Garage */

PARAMETERS
   DATE          startdate;
   DATE          enddate;
END;

LET PAGEWIDTH = 75;
LET DATABASE = "repairs";
LET boxend = 27

SELECT name, ATTR 'customer no.', address, date,
   ATTR 'job no.', description, number, ATTR
   'hours', rate
   FROM customers, 'hours', rates, jobs
   WHERE customers.number = jobs.'customer no.'
   AND jobs.'job no.' = 'hours'.'job no.'
   AND 'hours'.code = rates.code
   and name MATCH "*Wong*|*Watson*"
   AND jobs.date RANGE var.startdate TO var.enddate
   SORT BY ATTR 'job no.';
DEFINE total = rate * ATTR 'hours' * 1.5;

LET boxtop =
"____________________________________________________________";
LET boxline =
"|       |                                         |        |";
LET boxmid =
"|-------|-----------------------------------------|--------|";
LET boxbase =
"|_______|_________________________________________|________|";
LET boxhead =
"| Date  | Job Description      Mechanic Hours Rate|  Total |";

LET datepic = "AAAAAAAAA dd, yyyy";
HEADER
  NEWLINE 4;
      PRINT "Universal Automotive Services",
         COL 42, "FOR THE BEST IN AUTO SERVICE", NEWLINE;
      PRINT "1757 El Camino Real", COL 54,
         "(415) 957-8203", NEWLINE;
         PRINT "Bayville, CA 92304", NEWLINE 2;
      PRINT COL 30, "INVOICE", NEWLINE,
         COL 30, "-------", NEWLINE;
END;

FOOTER one
   PRINT "Invoice due on receipt.", NEWLINE;
   PRINT "Please make check payable to: ",
      "Universal Automotive Services",
      NEWLINE 2;
   PRINT "- - - - - - - - - - - - - - - - - -",
      " - - - - - - -", NEWLINE 2;
   PRINT "RETURN THIS STUB WITH YOUR PAYMENT", NEWLINE 2;
   PRINT "Invoice No.: 92-0", ATTR 'job no.',
      COL 41, "Total Amount: ", grandtotal
      PICTURE "$FFF9V.99" WIDTH 8 RIGHT, NEWLINE;
   PRINT COL 25, "_____________", NEWLINE;
   PRINT COL 8, "AMOUNT ENCLOSED", COL 25,
      "|$           |",NEWLINE;
   PRINT COL 25, "|_____________|", NEWLINE 2;
   PRINT "Customer number: ", ATTR 'customer no.',
      COL 41, "Date: ", TODAY PICTURE datepic,
      NEWLINE 3;
END;

FOOTER two
   NEWLINE 2;
   PRINT COL 3, "FOR THE BEST IN PARTS AND SERVICE",
      " UNIVERSAL AUTOMOTIVE SERVICES", NEWLINE 2;
   PRINT COL 15, "1757 El Camino Real, Bayville, CA 92304",
      NEWLINE;
   PRINT COL 27, "(415) 957-8203", NEWLINE 3;
END;
FOR EACH GROUP OF ATTR 'job no.'
   PRINT COL 40, "Invoice No.: 92-0", ATTR 'job no.',
      NEWLINE;
   PRINT COL 40, "Invoice Date: ", TODAY
      PICTURE datepic, NEWLINE 2;
   PRINT "Customer: ", name, COL 54, "Page: ",
      PAGENUMBER, NEWLINE;
   LET temp = address;
   WHILE (temp != "")
   DO
      PRINT COL 12, temp WIDTH 40 OVERFLOW
         INTO temp, NEWLINE;
   END;
   NEWLINE;
   PRINT boxtop, NEWLINE, boxline, NEWLINE,
      boxhead, NEWLINE, boxmid, NEWLINE,
      boxline, NEWLINE;

FOR EACH RECORD
   PRINT "| ", 'hours'.date PICTURE "MM/DD",
      COL 8, " | ", description,
      COL 34, 'hours'.number WIDTH 8 CENTER,
      COL 44, ATTR 'hours' PICTURE "GF9V.9",
      COL 49, rate * 1.5 PICTURE "G$FF9V.99", "/hr |",
      COL 61, total PICTURE "G$FFF9V.99", " |", NEWLINE;
   IF LINENUMBER > boxend
   THEN
   USE FOOTER two;
   PRINT boxline, NEWLINE;
   PRINT "|     |          CONTINUED ON NEXT PAGE
      "    |          |", NEWLINE;
   PRINT boxbase;
   NEWPAGE;
   PRINT COL 40, "Invoice No.: 92-0", ATTR 'job no.',
      NEWLINE;
   PRINT COL 40, "Invoice Date: ", enddate
      PICTURE datepic, NEWLINE 2;
   PRINT "Customer: ", name, COL 54, "Page: ",
      PAGENUMBER, NEWLINE;
   LET temp = address;
   WHILE (temp != "")
   DO
      PRINT COL 12, temp WIDTH 40
         OVERFLOW INTO temp, NEWLINE;
   END;
   NEWLINE;
      PRINT boxtop, NEWLINE, boxline, NEWLINE,
         boxhead, NEWLINE,boxmid,
         NEWLINE, boxline, NEWLINE;
      END;
   END;
   WHILE LINENUMBER < boxend
   DO
      PRINT boxline, NEWLINE;
   END;
   PRINT boxline, NEWLINE, boxmid, NEWLINE;
   LET grandtotal = SUM OF total;
   PRINT "|          |          "
      "TOTAL FOR THIS INVOICE ",
      "     |", COL 61, grandtotal PICTURE
      "G$FFF9V.99", " |", NEWLINE;
   PRINT boxbase, NEWLINE 3;
   USE FOOTER one;
   NEWPAGE;
   LET PAGENUMBER = 1;
END;
Run the script. You should see:
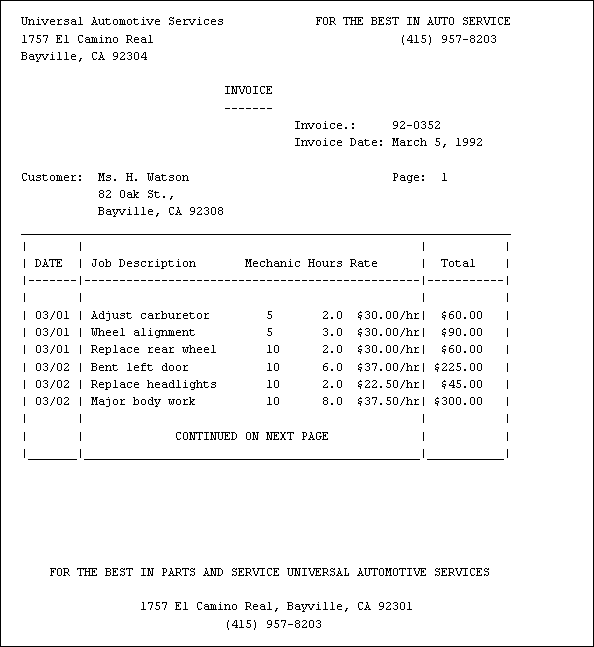

We now have a report script which behaves gracefully when the unusual occurs, an important point which is often overlooked.
This concludes the chapter on Empress Report Writer examples. You should now have enough knowledge of Empress Report Writer to produce a wide variety of reports. We encourage you to consult the reference chapter, particularly the sections on line, page and column controls, for details which have not been illustrated in these examples.
To summarize, we have covered the following features of Empress Report Writer in this chapter: