 Figure 3-2 Application Manager Window
All Empress 4GL applications are developed by entering data into the appropriate tables in a database. There are eight tables involved. In order to facilitate the entry of this data, there is a development application which is itself an Empress 4GL application. This next section will briefly describe the tables involved in an application as well as the development application that you can use to create one.
Keep in mind that you can develop an Empress 4GL application in several other ways, such as using Empress SQL, the Empress Host Language Interface or even another Empress 4GL application to enter the appropriate data into the tables. You can then compile, link, and run the application using the Empress 4GL commands.
All the Empress 4GL applications are stored in the Empress 4GL tables. The tables have the name of the application as part of the record. Each item belongs to a specific application.
The Application Table is called sys_4gl_application. There is one record in this table for every application that exists in the database. It also has information relating to the enter and exit scripts for the application, link libraries, and global key contexts.
Windows are defined by entries in the sys_4gl_window table. This table includes the following information:
For every field in an application, there must be at least one record in the sys_4gl_field table. These records have a number of attributes. For instance, the field name should match the name of the field referred to in the form. Other information includes the name of the field's window, information relating to the next and previous fields, data type, field mode, default, save name, range, and the field's enter and exit scripts.
A domain is a set of field characteristics that a group of fields can use. Each field that accesses a domain will have the same characteristics. This lets you easily set up fields that have the same characteristics. The definitions are stored in the sys_4gl_domain table.
Key contexts are defined in the sys_4gl_key table. A set of records is defined with the same key context name to create a single key context. Each record will contain a key script for a single key and the key label for that key. As well, a flag will indicate whether or not to use the field exit script of the current field before the key script is executed.
Subscripts are procedures within an Empress 4GL application. They are stored in the sys_4gl_script table along with a script, a script name, and a return type.
The forms you create in an Empress 4GL application are stored in the sys_4gl_form table. Each record will contain the p-code, an internal Empress 4GL code, which defines the form and the form name.
After you compile an application, the p-code that is generated is stored in the sys_4gl_compile table. There can be several records, depending on the size of the application. Each will contain a block of p-code and a sequence number.
The final table is sys_4gl_link which contains the p-code for the linked application. This will contain records similar to those in the sys_4gl_compile table. When an application is run, Empress 4GL looks here for its executable code.
Empress 4GL provides a development application which allows you to develop Empress 4GL applications. The development application itself is an Empress 4GL application. To invoke the development application, type in:
emp4gl database
where:
database is the name of the database.
The Main Menu is comprised of three major sections. These are the:
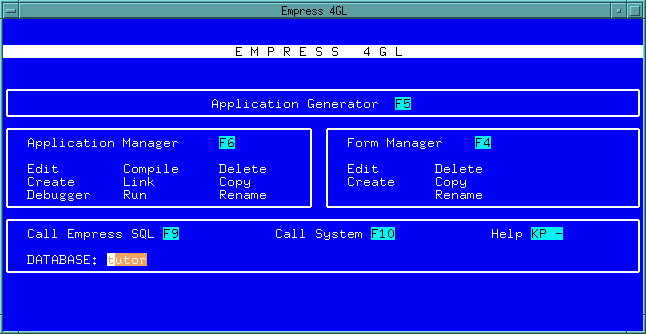 Figure 3-1 Empress 4GL Main Menu
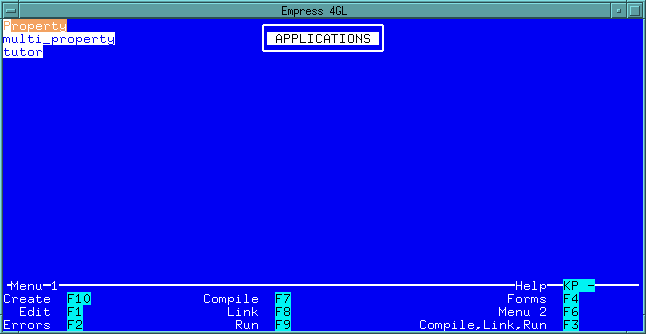
For example, assuming that there are three applications existing in
the database (property, multi-property and tutor) pressing
the Application Manager key will produce the following window:
Figure 3-2 Application Manager Window
Pressing the function key for Menu 2, the following screen
appears:
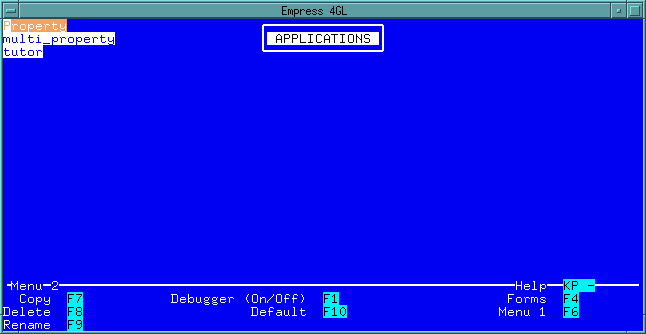 Figure 3-3 Application Manager Window - Menu 2
When editing or creating an application, there are several windows which will become available. These correspond to the six tables that were described in the previous section. The sys_4gl_compile and sys_4gl_link tables are managed by the compile and link commands.
Each window will have the basic data entry functions to select records, move between records, insert, update, delete, and clear the screen. The only exception is the applications window, which does not allow insert, delete, next, or previous functions. There are also functions for the pop-up Tables Menu, Remove Menu, access to SQL, and Field Editor Help in each of the windows.
For example, pressing the Edit key on the application tutor will produce the following window on your screen.
Figure 3-4 is Page 1 of the Application window:
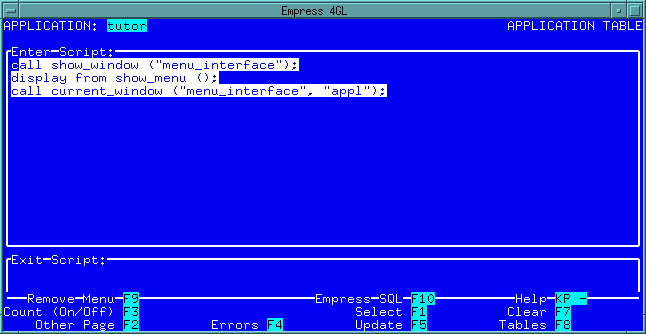 Figure 3-4 Application Window - Page 1
The application name appears on the top of the window. The name is displayed for your information and cannot be changed. The same is true for all of the windows that will be discussed below. This page allows you to enter the enter_script and exit_script. The menu at the bottom of the screen can be removed (Remove Menu) to allow more room for the exit_script.
By pressing the Other Page key, the second page of the Application
window will appear. Pressing it again will return you the first page. The
same functions are available for either page since these two pages are
treated as a single window.
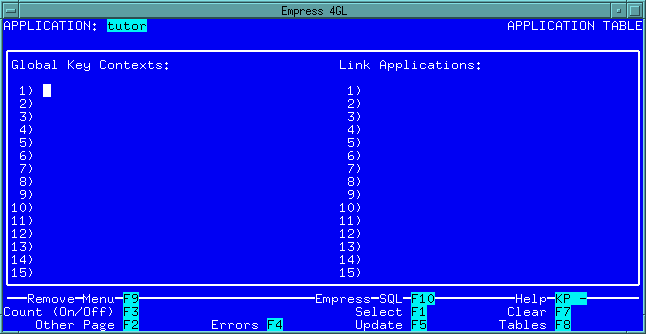 Figure 3-5 Application Window - Page 2
The second page of the Application window contains information about the global key contexts for the application and link applications that will be used as libraries.
There are no insert or delete functions in this window. This is because there can only be one entry in the sys_4gl_application table for a given application. This entry is added when you create the application and removed when you delete it. You can change the application's name using the rename function. Within the window itself, you may only update the contents of the other four attributes.
When you press the Update key, the values that are in the fields on both pages will be written to the database record. There is a Select key and no Next or Previous since there is only one possible record. This allows you to re-select the record from the database if you make changes that you don't want to keep.
Other functions available include a Clear key to remove all the data from the fields (except the application name).
The Errors key allows you to display the first error message of the most recent compile or link.
Count (On/Off) key will set a flag that tells the application to display the record count information when selecting records from the various tables. This function will toggle the display off and on.
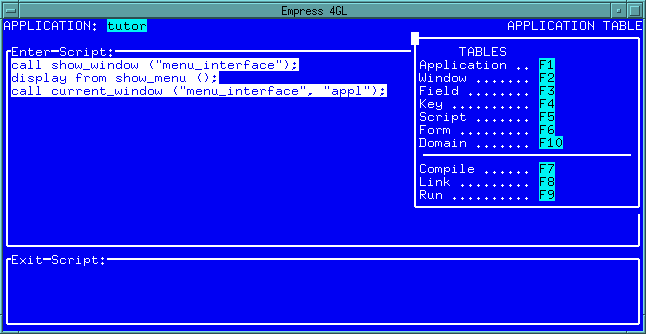 Figure 3-6 Application Window - Tables Menu
3.2.4 Window Window
To define a windows for the application, you must enter its definition
into the sys_4gl_window table. In the development application,
this is accomplished by selecting the Window function key from the Tables
Menu.
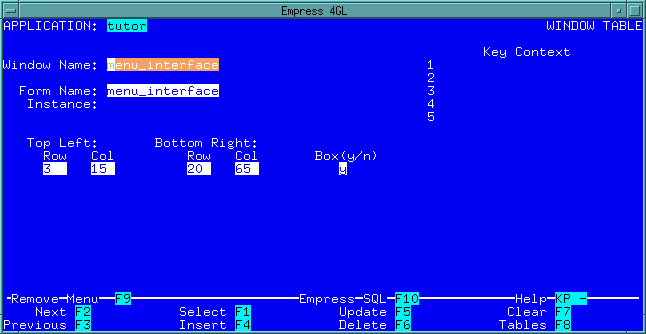 Figure 3-7 Window Window
The Window window displays the application name as the Application window did. It cannot be changed in this window or any of the windows and can only be changed with the Rename key in the Application Manager.
You can enter the window name which can be up to 32 characters long. This is the name that will be used for the rest of the application to refer to the window and, indirectly, the form that will be displayed in the window.
As well, a list of key contexts can be entered. Each context must be on a separate line. There is space for five on the window, but you can enter more. To enter the name of more than one key context in the Key Context field, press the <Return> key when the Field Editor is in insert mode.
Finally, you enter whether or not you wish the window to have a box around it. Keep in mind that two rows (top and bottom) and two columns (left and right) will be used for the box. This makes the window smaller by two in each direction.
There are several functions that are available in this window. Most have to do with managing the window definitions.
The Insert, Update and Delete functions are fairly straight forward. They are used to add new window definitions and change or delete existing ones.
The Insert function will add the new definition regardless of whether or not you have a current record (i.e., a Select has been performed). Once the record has been inserted, the context is disabled so that no Update or Delete functions may take place until it is re-enabled. This is accomplished by using the Select, Next or Previous functions to get a current record.
Warning
When a record is inserted, it is still on the screen although it is not the current record. It cannot be updated until it is selected from the database once again.
The Insert and Update functions are restricted by the unique index limitation on application name and name in the table. If you try to enter the same window name twice you will get an error message. This avoids duplication.
The display functions include Select, Next, Previous and Clear. These allow you to select window definitions from the database and browse through them. When you press the Select key, the application will look for all the window definitions in the database that match the criteria that has been entered in the window. The only field that will restrict the search in this window is the window name. You can use pattern matching in this field if you wish.
Once all the records that meet the criteria have been selected (all of the records if window name is null) then the first will be displayed. As well, if the Count (On/Off) option has been turned on, an information message will display Record 1 of 3 (or however many there are). The Next and Previous functions can then be used to bring the other selected records into the window (the message will be updated if the Count (On/Off) option is on). Once the record that you want to work with is highlighted, you can update it, delete it or use it as a basis to add a new window.
The Clear function will simply clear the fields on the window to give you a clean slate to work with.
There are four other miscellaneous functions available in this window. The first of these is the Help function. It will display a window which shows all the key mappings for the Field Editor. If you forget which key to use for a function, or if you want to see if a specific function is available, use the Help.
Hint
When you are designing your own applications, you will likely want to include the Help function on your menus.
The Tables function is the same as it was for the application window. It will bring up the pop-up Tables Menu which allows you to go to other windows in the application.
The Empress SQL function will start up an SQL session. When this session ends, control will pass back to this window.
Finally, the Remove Menu function will remove the menu from the bottom of the screen. This allows more room at the bottom. In the Window window this is not of much use since there are no fields that low, but for other windows it will be useful. The same key will bring the menu back.
3.2.5 Field Window
The window which is used for defining fields is the Field window.
It is accessed from the Tables Menu by pressing the Field
function.
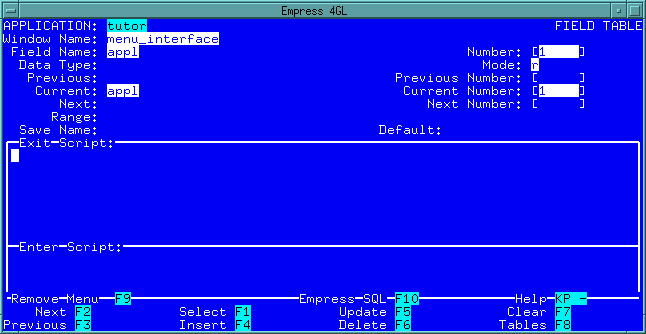 Figure 3-8 Field Table
There is a field which corresponds to every attribute in the sys_4gl_field table.
Keep in mind that the application name is still a skip field (as it is in all the windows). It is displayed at the top of the window.
Hint
While having to define the field twice when it is used in two different windows is extra work, it allows you to have the field behave differently in different windows. For example, in one window it could have a range defined while the other doesn't.
These four fields are used to determine which field is being defined. The name must refer to a field that has been defined on the form which the window is displaying. If it doesn't, you will get an error when you link the application.
The field number should usually be set to 1 for normal fields. It will only come into effect when dealing with multi fields but must still be specified, even for normal fields.
When dealing with multi fields, you can create a field definition for each of the elements of a field. Each element can be different from the others in any of the attributes (except for the window name and name of the field).
However, you will usually want most of the elements to be the same. In this case, you can use field number 0. It indicates that the definition is a default definition which applies to all field numbers for this field. To over-ride the default for a specific field number requires that a definition with that specific field number be entered.
By default, all fields have a data type of character. However, they can be specified as any of the five generic data types (INTEGER, DECIMAL, FLOAT, CHARACTER and DATE) or the twelve Empress data types. If you wish to use the Empress data types, use the keyword MS and then the data type. For example, MS CHAR (3, 1)).
| w | Write mode - allows the user to move the cursor to the field and enter data |
| r | Read mode - allows the user to move the cursor to the field but they cannot enter data |
| s | Skip mode - the user cannot even move the cursor to the field (it appears to be background text to the user) |
By default, the mode is s. The skip mode allows you to put information only messages into your window. Read mode is useful for allowing a user to highlight an option while write mode is for normal data entry.
3.2.5.6 Previous and Next Fields
The previous and next fields (as well as previous number and next number)
relate to how the Next and Previous keys will function
in this window.
By default, the Next function will move the cursor to the next field to the right on the same line. If there isn't one, it will move the next line that has fields and place the cursor in the first field (leftmost) on that line. If there are no fields below the current one, the cursor will move to the first field on the window. The Previous function will move in the opposite direction.
Most of the time this is desirable, but sometimes you need to change the order. For example, you may want to move the cursor down a list, then over to the next column and down again. Or you may want to move more randomly. This is where the next and previous fields come into play. They allow you to specify where to go to from the current field.
You can also specify field numbers for next and previous. If it is left blank, then the field number of the current field is used. If a specific number, then that field number is used. As well, "+" and "-" can be used to go up and down a line.
Warning
When you are using the define_multi feature, the next and previous field must be handled in a special way to keep the cursor on the same line. This will be discussed in a future lesson.
Examples
The following is list of different ranges; the first, a list of choices, the second, a pattern match and the third, a range of numbers:
'male', 'female'
SMATCH '[yn]'
RANGE 100 TO 300 EXCL,
RANGE 400 TO 500 EXCL
It is possible to save the value of fields at any time. These values can later be compared to the existing values, or restored, etc. Normally, the value is stored in a separate location for each individual field. However, it is possible that you want two different fields to store the same value (e.g. the field name and current on the field window might want to use this). In this case you should give both fields the same save name (this is similar to having two windows use the same form instance).
3.2.5.10 Scripts
Finally, there are two scripts associated with a field. The first is the
exit script. This is the code that is executed when the field exit event
is detected. This could be when the cursor moves to another field or when
a key event is detected which does not ignore the field exit.
As well, there is the enter script which is the code for the field enter event (i.e. the cursor moves into this field).
The functions on the field window are identical to those on the Window window. In this case, the Remove Menu function will benefit when editing the enter script field as it provides two more lines for coding.
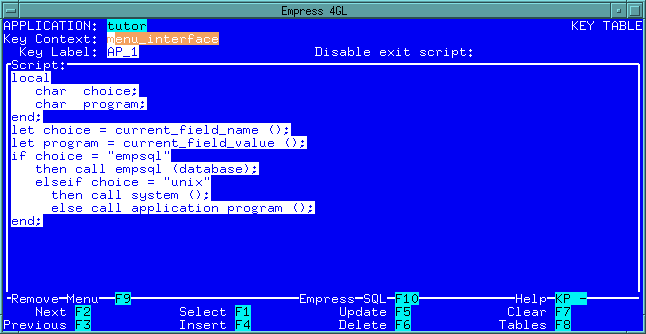 Figure 3-9 Key Table
3.2.6.1 Application Name
The application name is displayed at the top of the window
(as always). It cannot be changed.
3.2.6.2 Key Context Name
The name of the key context is important. All records in the application
which have the same key context name are grouped together to form the key
context. The only restriction is that you cannot define the same key twice
within a single key context.
3.2.6.3 Key Label
The key label is the label which references into the Terminal Database.
Within the Empress 4GL, the key label is used to reference
a key on the terminal. Since not all terminals have the same key layout,
a single key label may map to different physical keys on two different
terminals. For example, AP_1 is a key label that maps to KP
7 on VT100 terminals. On a Sun console it would map to R1.
This allows you to design your applications without worrying about which
key will be used on what terminal.
The list of key labels and physical keys that they are mapped to for a VT100 are shown in. Notice that some of the key labels will map to more than one physical key. For example, <Return> and <GO_LEFT> in this list.
3.2.6.5 Script
Finally, the script itself. This is the code that will be executed when
the key event is triggered. This code can do anything that you wish to
have happen when the key is pressed. It could select from the table, display
other windows, perform calculations, etc.
The script is stored as a text attribute in the table so that it can be as long as necessary.
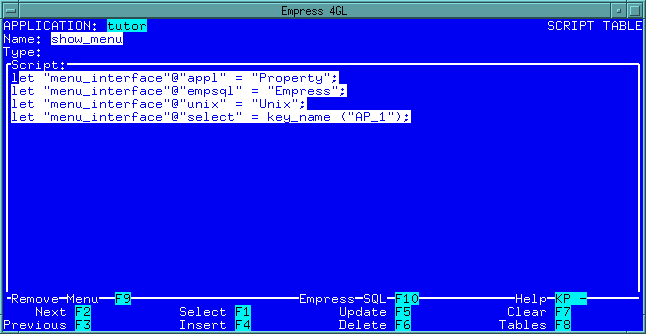 Figure 3-10 Script Table
3.2.7.1 Application Name
The application name is at the top of the window. It is
in skip mode.
3.2.7.2 Script Name
The name of the script can be up to 32 characters long.
The only requirement is that the name be unique within the application.
This is the name that will be used when executing the subscript (either
as a procedure or function).
3.2.7.3 Return Type
If a script is to be used as a function, it is necessary to know what type
of value is going to be returned. The return type field will specify
one of the five generic data types as the type of value returned. If none
is specified, character is assumed.
3.2.7.4 Script
This is the actual code that is executed when the procedure or function
is called. Remember that if you are designing a function, there should
be at least one return statement in the script to pass a value back.
3.2.8 Form Window
The Form window is actually the Forms Manager window.
It allows you to create, edit, copy, rename, and delete forms. It is possible
to copy forms to or from other applications and even other databases.
This is the Forms Manager window:
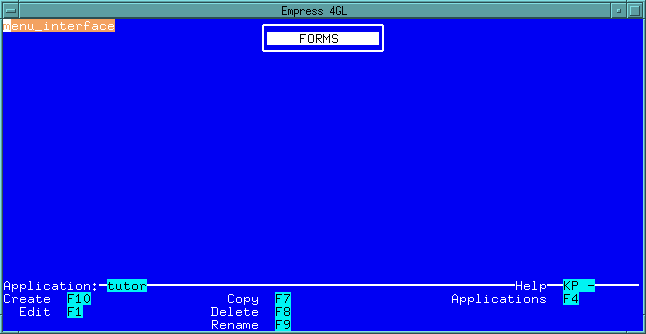 Figure 3-11 Forms Manager Window
When you enter the Forms Manager from the Tables Menu, you can only access the forms which are part of the current application. Also, when you exit the Forms Manager, you will return to the Tables Menu if it was called from there.
 Figure 3-12 Domain Table
3.2.9.1 Functions
The functionality for this window is the same as the Window window
and Field window.
3.2.9.2 Using a Domain
When the field is created, the name of a domain can be specified. The values
from this domain are used to fill in any that are left blank in the field
definition. If both the field definition and the domain have nulls for
a particular field attribute, it will be left at its default.