 Figure 4-1 Form Manager Window
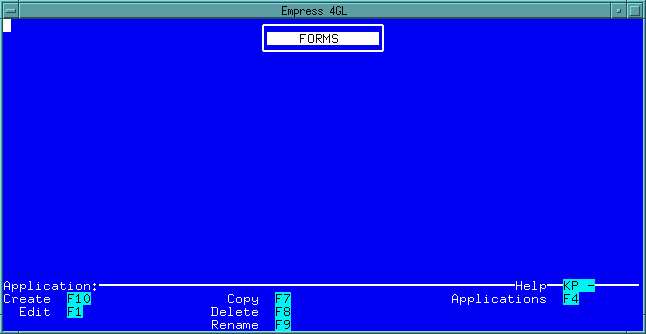
The initial screen for the Form Manager is called the Form Manager window. It lists all the forms that exist in the database. From this screen, you can copy, rename, delete, edit, and create forms. You can also invoke the Application Manager from the Form Manager.
This is the Form Manager window:
Figure 4-1 Form Manager Window
The Form Manager provides you with the Form Editor. The Form Editor is a full-screen editor that allows you to create, design and modify forms. It simulates a blank sheet on which you can paint a form exactly the way you want it to appear in your application. Editing a form consists of:
You can also modify a form by repainting parts of it, and adding, moving or removing fields. The following chapters describes the operation of the Form Editor and the commands that are used to control it.
 Figure 4-2 Empress 4GL Main Menu
If there are some forms which have been created in the database, the
names of the forms will be listed on the screen. You can move from one
form name to the other, choose the one that you want to edit and press
the Edit key. Then the form will appear on the screen waiting
for your action. If no form exists or you wish to create a new form, then
press the Create key.
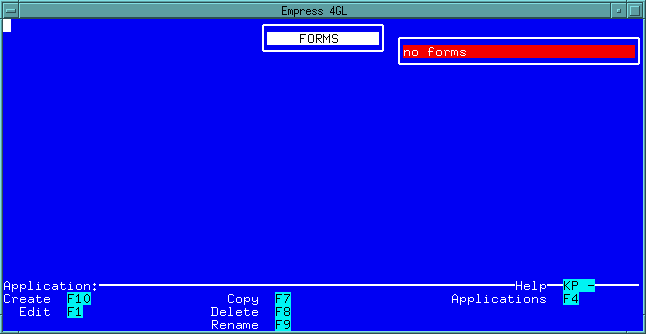 Figure 4-3 Form Editor
Before you can use the Form Editor to create a new form, you must enter
the name of the form and the name of the application that will used this
form.
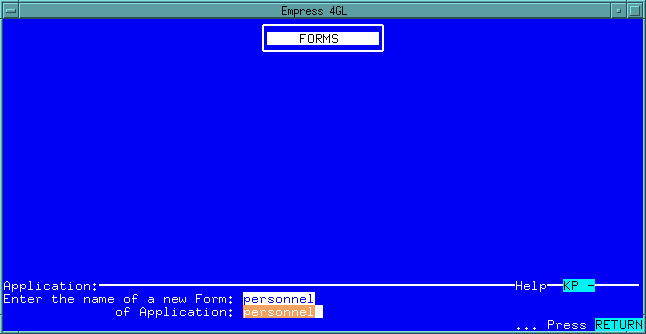 Figure 4-4 Form Manager Window
Once the <Return> key is pressed, you are in the blank area that
allows you to paint a form for the application.
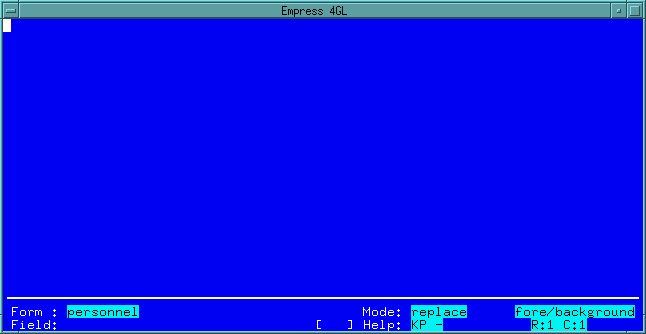 Figure 4-5 Form Manager Window
Below the blank area is the status area which is described in the next section.
| Form: | the name of the form being edited. |
| Field: | the name of the field on which the cursor is positioned. If blank, the cursor is not currently in a field. The field name is subscripted with a field number in square brackets ([]). The first field created with a given name is subscripted [1]. Subsequent fields of the same name are subscripted [2], [3], and so on. |
| Mode: | the current activity. Replace mode is the default data entry mode. The possible modes are: |
Table 4-1
| Form Editor Modes | |
| Mode | Description |
| Replace mode | The Text you type will replace any text in the area you type over. |
| Insert mode | The text you type will be inserted immediately under the cursor. Any text under and to the right of the cursor at your starting position will scroll to the right. |
| Create Box | Your cursor movements are defining the perimeter of a box. |
| Create Field | Your cursor movements are defining field lines. |
| Create Video | Your cursor movements are defining a video region. (See the section "Editing the Background" that follows.) |
| Join Fields | You are in the process of joining two fields. |
| Multi Mode | The Form Editor can be placed into multi mode so that fields of the same name are treated as a unit. Refer to the Help screen for the key to multi mode. |
| Help | Key to call up the Form Editor Help screen. |
| fore/background | Default mode that means you are working on both the foreground and the background, with the foreground (fields) taking precedence in any area where there is a field. This mode can be switched to background only, in which case only the background will be visible. |
| R:1 C:1 | The row and column offset of the point on the form under the cursor. The offset is from the (1,1) home point of the form, which is initially just past the top left corner of the screen. If the cursor is moved to the left or up so as to scroll the form, the (1,1) point will move into the interior of the form. The home position can be redefined; when this occurs, whatever point on the form is just past the top left corner of the screen becomes the new (1,1) point. |
4.3 General Editing Conventions
4.3.1 Positioning Forms
When an application is run, a form is brought to the screen through an
instruction to show the window associated with the form. There are two
ways this can be done: either the window is shown without a field becoming
current, in which case the cursor will be sent to the top left hand corner
of the window or the window is shown and a field is made current, in which
case the cursor will move to the current field.
The manner in which a window is shown affects the positioning of the form within a window:
Setting a home position resets the row and column indicators for the form or field relative to the top left hand corner of the screen, as seen while in the Form Editor. This is done with a Form Editor command, and is described in the next section.
Note
Resetting the home position of a form does not affect the home positions of its fields.
Scrolling, however, does not occur as a result of typing in data at the edge of the editing area; this will only cause the Form Editor to beep. To edit part of a form that is outside the editing area, you must first scroll over the form to bring the part you wish to edit onto the screen.
A video region is an area where the background has the corresponding video attribute (it may be in reverse video, color, and so on). To create such a region you must use a Form Editor command, pressing the appropriate function keys and moving the cursor to define the region. Regions can be painted over any number of times with different video characteristics. To restore a region to normal, paint it over with a normal video attribute.
A box is painted in the same way that a video region is created, pressing function keys to give a command to the Form Editor, and outlining the perimeter of the box. A line can be painted by creating a box with no depth. A function key is provided to delete a box.
The Form Editor provides a Put function which is useful for duplicating video regions and boxes. Used after a Create function, the Put function duplicates the item created at the current cursor position. The Put function can also be used to move boxes. After deleting a box and moving to a new position on the form, the Put function places the deleted box at the new position.
Function keys are provided to insert and delete lines on the form. Inserting and deleting lines affect background text, but do not affect boxes and video regions. A function key is also provided to delete background text characters.
To create a field you must move the cursor to the position on the form where the field should begin, and press the function keys giving the Form Editor the command to create a field. You can then move the cursor horizontally to define its length. Vertical cursor movements while creating a field will either generate several lines of a single field, or several sequentially numbered fields of the same name, depending on whether the Form Editor is in its default mode or in multi mode. When a field is created it is given a default name (n for the nth field created) and number (beginning with 1 and increasing with each field of the same name).
To specify the characteristics of a field you must move the cursor into the field and press the function key giving the Form Editor the command to edit the field. A small form will appear at the top left corner of the screen, on which you can specify the new field characteristics. There are several field characteristics that can be edited, of which the most important is the name of the field. This must be unique in the form, and should have some mnemonic value.
To delete a field (or group of fields sharing a name) move the cursor to the field and press the appropriate function key. The Form Editor's Put function can be used with fields: after creating a field the Put function will create another field or set of fields; after deleting a field the Put's Undo function is useful if you change your mind after creating or deleting a field. The undo will remove the last field(s) you created or replace the last field(s) you deleted.
This function can be found in the Help screen.
 Figure 4-6 Help Screen
4.4 Single and Multiple Fields
The fields on a form are identified by name and field number. While it
may be obvious that fields with different names are distinct, it is important
to remember that fields with the same name and different numbers are also
distinct fields. Editor operations on a field will, by default, leave other
fields of the same name unaffected. However, the Form Editor can be placed
in a mode called multi mode so that many operations affect fields
of the same name as a unit.
The Create Fields function is an example of a function whose effects vary depending on whether the editor is in normal or multi mode. (When the Form Editor is invoked it is not in multi mode, so we refer to its default mode as the normal mode.) When creating a field in normal mode, vertical cursor motions cause a single field having multiple field lines to be created. These lines are segments of the same field, the field's name and number refer to the field having several lines as a unit. When creating a field in multi mode, however, vertical cursor motions cause distinct fields of the same name to be created, with numbers assigned sequentially.
There are also other functions which are affected, depending on whether the Form Editor is in normal or multi mode and they are:
These functions are all described in the next section.
The Help screen will look something like this:
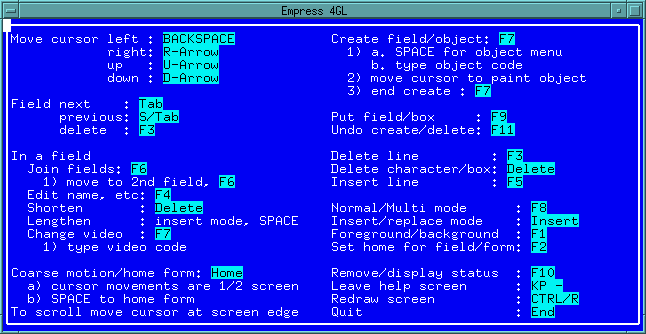 Figure 4-7 Help Screen
Each of the Form Editor commands is described in the following pages.
| cursor left | Moves the cursor one position left. If the cursor is already at the left edge of the screen, the entire form will scroll one column to the right. Pressing this key immediately after the Coarse motion key moves the cursor half a screen to the left; if the cursor is already at the left edge of the screen, the form will scroll half a screen to the right. |
| cursor right | Moves the cursor one position right. If the cursor is already at the right edge of the screen, the entire form will scroll one column to the left. Pressing this key immediately after the Coarse motion key moves the cursor half a screen to the right; if the cursor is already at the right edge of the screen, the form will scroll half a screen to the left. |
| cursor up | Moves the cursor one position up. If the cursor is already at the top edge of the screen, the entire form will scroll one row down. Pressing this key immediately after the Coarse motion key moves the cursor half a screen up; if the cursor is already at the top edge of the screen, the form will scroll half a screen down. |
| cursor down | Moves the cursor one position down. If the cursor is already at the bottom of the editing area, the form will scroll one row up. Pressing this key immediately after the Coarse motion key moves the cursor half a screen down; if the cursor is already at the bottom edge of the editing area, the form will scroll half a screen up. |
4.5.2 Field Commands
The following commands operate on fields:
| Field next | Moves the cursor to the next field in the form. In multi mode the cursor moves to the next field with a different name. |
| Field previous | Moves the cursor to the previous field in the form. In multi mode the cursor moves to the previous field with a different name. |
| Field delete | Deletes the field the cursor is resting in. In multi mode this deletes all fields sharing the name of the field the cursor is resting in. This is the same as the Delete Line key, therefore, pressing this key when the cursor is not in a field deletes a line from the background. |
Note
To move a field, first you must move the cursor to the field and delete it using the Field Delete key. Next, move the cursor to the position on the form where you want the field to begin then press the Put key. This restores the field in the new position.
| Join fields | In normal mode this joins two fields; in multi mode, this renames a set of fields after another set; as described in the table below: |
Table 4-2
| Joining Fields | |
| Mode | Process |
| Normal mode | First move the cursor to any field line of the first field and press the Join Fields key. Then move the cursor to any field line of the second field and press the Join Fields key. No visual change will register on the form, but the second set of field lines is now part of the first field. |
| Multi mode | Move the cursor to any field of the first group and press the Join Fields key. Then move the cursor to any field of the second group and press the Join Fields key. The second set of fields will be renamed after the first set, and assigned numbers sequentially following the last number of the first set. |
| Edit name, etc. | Allows you to edit the characteristics of a field. Move the cursor into the field you wish to edit and press the Edit name key. A small pop-up window will appear at the top left corner of the screen, the cursor will move to the first field in that window, and control is passed to Empress 4GL's Field Editor enabling you to enter your modifications. In normal mode this function affects only the field the cursor is resting in when the key is pressed. In multi mode the function affects all fields with the same name. Field characteristics are described in the next table. |
Table 4-3
| Field Characteristics | |
| Characteristic | Description |
| name | The Name of the field. Each field is assigned a default name when it is created (n for the nth field), but you may wish to change the name to something descriptive of the values that the field will carry. If you assign the field a name it must be unique in the form. Each field is also assigned a field number when it is created. You cannot change the field number since that is assigned by Empress 4GL. |
| video | This refers to the video characteristic of the field as it appears on the Form Editor and as it will appear in an application. The allowable values depend on the type of terminal you have and the names given to field attributes in your terminal configuration tables (described in the Terminals appendix). The value normal is always possible. The other possible values available to you will be listed by the Create field/object function described below. On a terminal that supports reverse video, the video characteristic of a field may be set up as described in the table below. |
| fill | This can take the values y or n. If the fill parameter is y (meaning yes), then the displayed field will always be padded out to its full length (with the fill character specified in the terminal configuration tables). If the fill parameter is n (meaning no), then the displayed field will only be as long as is necessary to display the current value of the field. If the required space is less than the length of the field any background text normally hidden by the field will appear. |
| delimiter | The delimiters (framing characters) for the field display. |
| fixed | The fixed size field flag, which limits the number of characters that can be entered to the length of the field display. It can take the value n (normal) meaning the field is not fixed, the value f (fixed) meaning excess characters overwrite existing ones, the value b (fixed ignore) meaning excess characters are ignored and a beep issued, or the value a (fixed autoskip) meaning the character that causes the field to become full also causes the cursor to automatically move to the next field. |
| entry | Whether entry is from the left or right edge of the field display. It can be l (left edge) or r (right edge). |
| pattern | The edit pattern for the field, which provides several options for the entry and display of numbers, characters, and dates. |
| domain | The name defining a set of field characteristics including most of the ones listed here. Characteristics set to null will automatically be picked up from the domain if they are defined there. (See the chapter on the Script Editor for details on how to create domains.) |
| window | The name of a window to which the form containing this field is attached (if any). |
To end the Edit name command, press either the Edit name key again or the Quit key. This removes the pop-up window in the top left corner of the screen.
Table 4-4
| Field Video Characteristics | |
| Value | Effect |
| normal | Normal video attribute when the cursor is off the field, with underscore as the fill character. Reverse video attribute when the cursor is on the field, with blank as the fill character. |
| reverse | Reverse video attribute when the cursor is off the field, with blank as the fill character. Normal video attribute when the cursor is on the field, with underscore as the fill character. |
| Shorten | Shortens the field the cursor is currently resting in. This is the same as the Delete Character key. |
| Lengthen | Placing the cursor in a field, then pressing the <Space Bar> while in insert mode, will lengthen the field. |
| Change video | This is the same key as the Create field/object key, and is an easy way to change the video attribute of a field. Move the cursor to the field, press the Change Video key. |
| Coarse motion/
home form |
sets the direction keys for Coarse motion and allows you to force the form back to its home position. For Coarse motion press the key and then a direction key. If the cursor is not at an edge of the editing area the cursor will move by either half a screen or to the edge, whichever is less. If the cursor is at an edge of the editing area, the editing area will move by half a screen, as shown in the following table. Moving the editing area to the left, places you further left in the form and is equivalent to scrolling the form to the right as described in the table below: |
Table 4-5
| Editing Area Movements | ||
| Editing area | Form | Key |
| left | move right | cursor left |
| right | move left | cursor right |
| up | move down | cursor up |
| down | move up | cursor up |
You can home the form by pressing the Coarse motion key followed by the <Home> key while the cursor is resting anywhere on the background of the form. This places the row one, column one coordinate of the form at the top left corner of the screen. You can "home" individual fields by pressing the Coarse motion key followed by the <Home> key while the cursor is resting in the field.
| Create field/
object |
Creates a field, a set of fields, a box or video region. A box is simply
line graphics in the background forming a box. A video region is an area
on the form with the corresponding video attribute. A new form has, by
default, the normal video attribute over the entire form. On a
color terminal this may be some color; the normal color is defined
in the terminal tables. Boxes and video regions are generally unaffected
by editing commands unless specifically mentioned. A box is deleted with
the Delete character/box command and a video region is deleted
by covering it with another video region of a different attribute.
After pressing the Create field/object key, you can select the object to be created according to the following table. |
Table 4-6
| Creating Objects | |
| Key | Command |
| space | Displays a menu in the top left corner of the screen. The menu shows
the keys you should press to create a field, video region or box/line.
This menu will also be presented if any invalid key is pressed.
The number of options presented on the menu depends on the video attributes available on your terminal and included in the terminal configuration tables. Fields and regions can be created with different video characteristics, and a menu item should be presented for each video attribute available to you. |
| field (attribute) | Creates a field with the corresponding video attribute. Move the cursor
horizontally to draw out the field to the desired length. In normal mode,
moving the cursor vertically will multiply its lines. In multi mode, moving
the cursor vertically will create a series of fields with the same name
and numbered sequentially. Each field or field line you create will appear
with the appropriate video attribute and fill character.
Each new field is given a default name when it is created; default field names are assigned in order of creation using integers as names. The first field is named 1, the second named 2 and so on. Each field of a given name is assigned a field number, starting with 1 and increasing with each use of the name. The first field created is thus 1[1]. In normal mode, only one field is created. Using the Create field function twice in normal mode creates the fields 1[1] and 2[1]. In multi mode, several fields can be created with the same name. Using the Create field function a third time, but in multi mode, creates the field 3[1], then moving the cursor down creates the field 3[2]. |
| video (attribute) | Creates a region of the corresponding video attribute. Move the cursor to paint any two sides of a rectangular region. |
| box/line | Creates a box or line. Move the cursor horizontally or vertically to paint a line, and expand to a box by continuing at right angles. On a color terminal lines may have their own color against the normal background; when painted on a colored region, they are in normal color. |
When you have painted the field, video region or box, press the Create
key to exit from Create mode. If you wish to abort the command
at any point, press the Quit key.
| Put | Repeats the most recent create command, or creates the last field or object deleted, whichever is most recent. The top left corner of the field or object is placed under the cursor. The field or object that you Put becomes the last item created as described in the following table. |
Table 4-7
| Put Effects | |
| Object | Effect |
| Put with a box | If a box was the most recent item created or deleted, an identical box is created on the form with its top left corner under the cursor. |
| Put with a region | If a video region was the most recent item you created, and there has been no intervening delete function, an identical region is created on the form with its top left corner under the cursor. |
| Put with fields | If create field was the most recent Create/Delete function, the Put function will create a field or set of fields similar to the last. In normal mode, the field(s) will be assigned a new default name. In multi mode, the field(s) will be assigned the same name as the last, and numbered starting with the next available number. If delete field was the most recent Create/Delete function, the Put function will create the field or set of fields deleted, using the same name as before. |
| Undo | Undoes the last Create, Delete field or object, or Put command. |
| insert line | Inserts a blank line above the line on which the cursor is positioned.
The lines below the new line will scroll down, the bottom line scrolling
off the editing area. The insertion and the scrolling affect only the portion
of the form that lies between the left and right edges of the screen.
If a line that extends beyond the visible portion of the form is affected by the insertion or scrolling, a discontinuity of the line will result. This effect can be used to advantage when editing multi-column forms, such as the help screen itself. |
| delete line | Deletes a line or a field line, depending on where the cursor is positioned as described in the following table. |
Table 4-8
| Delete Line Effects | |
| Cursor Position | Action |
| field line | In normal mode, the field line is deleted. If this is the only field line of the field, then it is deleted. In multi mode, all fields having the same name are deleted. |
| other | The line is deleted, including any field lines and background text on the line. The lines below the cursor will scroll up to fill the space left by the deleted line. Fields are affected by the deletion, but boxes and video regions are not. The deletion and scrolling only affect the portion of the form that lies between the left and right edges of the screen. |
| If a line that extends beyond the visible portion of the form is affected by the deletion or scrolling, a discontinuity of the line will result. This effect can be used to an advantage when editing multi-column forms, such as the Help screen itself. | |
| delete character/
box |
Deletes a character or box, depending on where the cursor is positioned as described in the following table. |
Table 4-9
| Delete Character/Box Effects | |
| Cursor Position | Action |
| box | The box is deleted. |
| field line | The field line is shortened by one character. If this is the only character on the field line, the field line is deleted. Everything from the cursor to the right edge of the screen is shifted left by one character. |
| character | A character can only be part of the background, so the background character is deleted. Everything from the cursor to the right edge of the screen is shifted left by one character. |
| Normal/Multi mode | Switches the Form Editor from normal to multi mode, and vice versa. Normal mode is the default Form Editor mode (operations on a field affect that field only). Multi mode is useful when you wish to treat fields sharing the same name as a group. For instance, in multi mode the Next field and Previous field functions will move the cursor to the next/previous field with a different name from the current field. In multi mode, many operations on a field affect all fields sharing the field name. This is true of Edit name, Change video, Delete field, Home field and Join fields. |
| Insert/replace | Switches the Form Editor from insert to replace mode, and vice versa. The current mode is shown in the status box at the bottom of the screen. The effect of typing a character depends on the current mode of the Form Editor as described in the following table. |
Table 4-10
| Form Editor Mode Effects | |
| Mode | Effect |
| Replace | The character under the cursor is replaced by the new character. Typing a character in an existing field will cause the Form Editor to beep. |
| insert | The new character is placed before the character at the current cursor position. Typing a character in an existing field will cause the field line to be lengthened by one character. In either case, everything on the line from the cursor onward will scroll to the right. |
| Foreground/
background |
Switches the Form Editor between foreground and background edit mode. The foreground edit mode is the normal mode and allows you to edit both the foreground and background of a form. However, in this mode it is not possible to place or edit background text under a field. In background mode fields do not appear on the form and the entire form background can be edited. |
| Set home for
field/form |
Sets the home position of the form or field. If the cursor is not on a field, the home position of the form is set in such a way that the row one, column one, coordinate for the form corresponds to the point currently at the top left corner of the screen. If the cursor is on a field, the home position of the field is set in such a way that the row and column coordinates of the beginning of the field correspond to the current offset of the field from the top left corner of the screen. |
| Remove/display
status |
A toggle key that controls whether the Form Editor status box at the bottom of the screen is shown. Initially the status box appears; pressing the Remove/Display Status key will remove it; pressing it again will display it. |
| Leave help screen | This is the same as the Help key for the Form Editor. It calls up the Help screen when you need it and removes it when you are finished. |
| Redraw screen | This key redraws the screen should there be any disturbance. |
| Quit | This key exits the Form Editor. When you press this key you will be asked if you wish to save the form. After this you will be asked if you want to leave the Form Editor. |
4.6 Leaving the Form Editor
When you have finished editing your form you may press the Quit
key to leave the Form Editor. A prompt will appear at the top right corner
of the screen:
Save form formname? (y/n)
where:
formname is the name of the form.
To save the current version of the form, type y. To discard any changes you have made in the current editing session, type n.
Then a prompt will appear at the top right corner of the screen:
Really quit? (y/n)Type y to quit. If you type n you may continue to edit the form. If you type y you will leave the Form Editor.
Leaving the Form Editor will return you to the Form Manager.