 Figure 6-2
The Application Manager allows you to copy, rename, delete, edit, create, compile, link and run applications. It also allows you to turn the Source Debugger on and off.
The Script Editor is a built-in editor that allows you to edit the scripts which make up an application. You will be using the Script Editor to modify existing scripts and write scripts of your own.
This chapter describes the operation of the Script Editor: it does not describe how to build an application. Information on building applications is presented in the Empress 4GL Programmer's Guide.
The format of the Script Editor reflects the structure of applications, allowing you to write:
The Script Editor allows you to select scripts, modify them, and update the tables. You can also write original scripts and insert them into the tables, and delete scripts that are obsolete.
The screen for the Application Table contains the following
function keys:
| Count (On/Off) | A toggle switch that controls whether the record n of N play display is shown at the top right corner of the screen. This message shows the relative position of the current record for each type (field, key, etc.) of script. The default for this Editor option is to display the message. |
| Other Page | A toggle between the page for the application enter/exit scripts and the page for global key contexts and list of applications to be linked. |
| Select | Selects and displays the application enter/exit script if there is one. |
| Update | Updates the record in the table. When you write or alter the scripts, remember to press this key, otherwise, your scripts will not be stored. |
| Clear | Clears the enter and exit script fields. |
| Tables | Displays a menu from which you can choose another kind of script to edit (field, window, key, etc.), move to the form editor, compile, link, or run the application. |
| Remove Menu | Removes the menu describing these functions for a more streamlined screen. |
| Empress SQL | Calls Empress. |
| Help | Calls up the Field Editor Help screen. |
| Errors | Displays the first of a list of errors generated by a compile or link of the application |
| Scroll | Moves to the field containing the first of a list of compile or link errors in order to scroll through the list. |
The screens for the Window, Field, Key, and
Script, and Domain Tables contain the following function
keys:
| Next | Displays the next record from those selected. |
| Previous | Displays the previous record from those selected. |
| Select | Executes a select on the table and displays the first record retrieved. Selection criteria are implicit in the appropriate field values, depending on the type of script (field, key, etc.), when the Select key is pressed. |
| Insert | Inserts the current record in the table. When you write a new script, remember to press this key, otherwise, your script will not be stored. |
| Update | Updates the current record in the table. When you alter a script, remember to press this key, otherwise, your changes will be lost. |
| Delete | Deletes the current record from the table. |
| Clear | Clears every field. |
| Tables | Displays a menu from which you can choose another kind of script to edit (application, field, key, etc.), move to the Form Editor, compile, link or run the application. |
| Remove Menu | Removes the menu describing these functions for a more streamlined screen. |
| Empress SQL | Calls Empress. |
| Scroll | Moves to the field containing the first of a list of compile or link errors in order to scroll through the list. |
| Help | Calls up the Field Editor Help screen. |
In the Editor, you can select the kind of script (field, key, etc.) you wish to edit from the Tables Menu. You can then supply the name of an existing script to retrieve it for modification, or write a new script with a new name for insertion. Script selection, insertion, update, deletion and other functions are driven by function keys. When editing, since the Script Editor is itself an Empress 4GL application, all the controls described for the Field Editor apply.
The Script Editor selects scripts according to the appropriate window, field, key, script or domain name, that you specify. If you do not specify anything all scripts of the current type are selected. If you wish to be more selective, you can use a pattern match. (Refer to the Empress SQL Reference manual under "WHERE Clause" for a discussion on pattern matching.)
Movement is possible between the Script Editor, the Applications Manager and the Form Manager. When you enter the Form Manager from the Script Editor you will see a list of the forms defined in the application. When you Quit any of these programs, you will return to the Script Editor from which you invoked it.
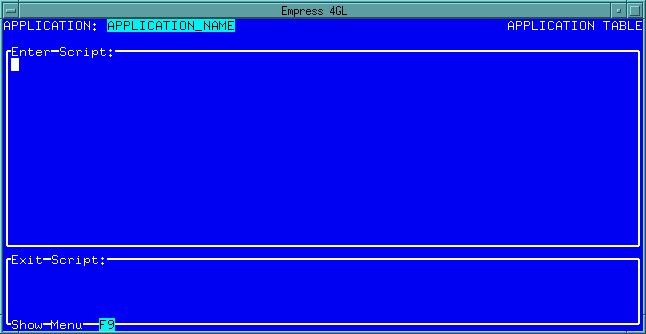
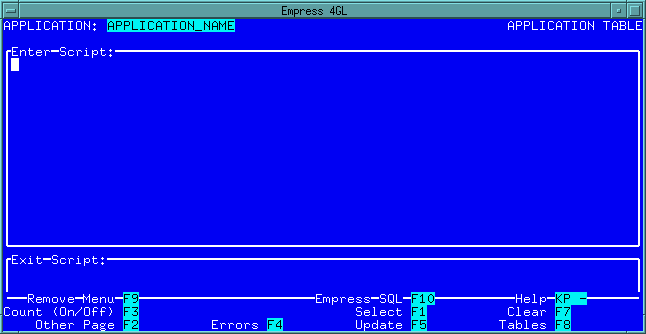 Figure 6-1 Application Table
An explanation of the items on the screen follows:
Table 6-1
| Fields | |
| APPLICATION | Always shows the name of the application is supplied when the Script Editor was invoked. |
| Enter Script | An area in which you may write the enter script for the application. This area will scroll when you reach the bottom of the box. To scroll back use the keys as described for Empress 4GL's Field Editor. |
| Exit Script | An area in which you may write the exit script for the application. |
Pressing the Tables key displays a menu from which you can choose another kind of script to edit; move to the Form Editor; compile, link, or run the application.
Pressing the Remove Menu key removes the function key menu
on the bottom of the screen for a more streamlined screen, as shown below:
Figure 6-2
To get the menu back, press the Show Menu key.
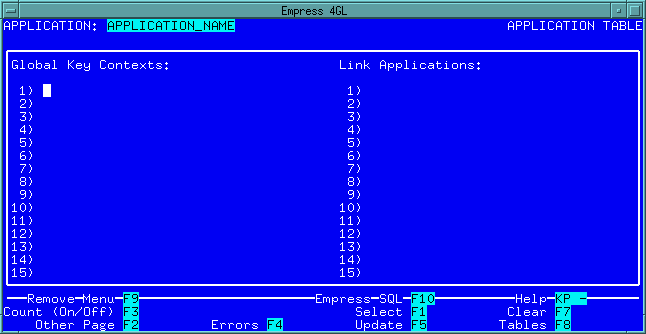 Figure 6-3
Global key contexts are key contexts that will be pushed onto the key context stack for every window in the application when the application is loaded. The global key contexts are pushed in the order they are specified, and are pushed before any key contexts specified in the window definitions. See the following section on "Defining Windows" for a further discussion of key contexts.
You can specify as many global key contexts as you wish, provided they are separated by new lines (pressing <Return> while in insert mode).
The applications to be linked to the current application should be specified under the Link Applications heading. You can specify as many applications as you wish, as long as they are separated by new lines (pressing <Return> while in insert mode). The order of the list is not significant. If the applications to be linked have enter or exit scripts these are ignored except for variable definitions in enter scripts.
Note
Insert mode is the default setting in this page.
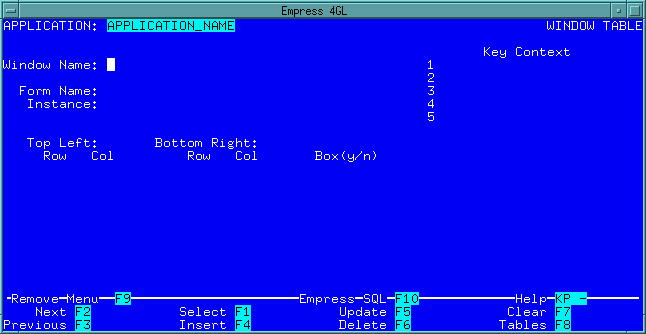 Figure 6-4 Windows Table
The Select function chooses records based on the Window Name field. If the field is empty, all windows in the application are selected.
Table 6-2
| Fields | |
| APPLICATION | Shows the name of the application for which you are defining windows. |
| Window Name | A field where you type the name of the window. Every window in the application has a unique name. You can create a window by supplying a new name. |
| Form Name | The name of the form that will be shown through the window. |
| Instance | An optional name for the form in this window. The form instance defaults to the form name unless otherwise specified. |
| Key Context | A field where you can specify the initial key contexts to be attached
to the window when the application is loaded. Several key contexts can
be specified, separated by new lines (i.e., by pressing the <Return>
key in insert mode). Insert mode is the default setting
for this field.
Each window has a stack of key contexts attached to it. These determine the function keys that will be active in the window. When a window is current, the key contexts attached to it are active. Each key context is a set of key labels with attached scripts. When the key context is active, pressing a key mapped to a key label causes the script attached to the key label to be executed. Key contexts that are higher in the stack override the ones lower in the stack. The key context on the top of the stack is guaranteed to define active keys in the window. Key contexts below the top of the stack may define active keys in the window, depending on the key labels used. Key labels not used in key contexts higher in the stack will define active keys in the window. If no key context is specified, the window name is used as the default key context name. If several key contexts are specified, they are pushed onto the key context stack in the order in which they are specified: the last key context specified will be on the top of the stack. See the script functions push_key_context and pop_key_context for additional control over key contexts in a window. The key contexts active in a window remain active while the window is the current window. Making another window current clears the active key context stack. |
| Top Left | A coordinate pair defines the top left hand corner of the window. Row
is the number of rows down, and Col is the number of columns to the
right, from the top left corner of the terminal screen.
If Row is not specified it defaults to 1, and if Col is not specified it default to 1. |
| Bottom Right | A coordinate pair defines the bottom right corner of the window. Row
is the number of rows down, and Col is the number of columns to the
right, from the top left corner of the terminal screen.
If Row is not specified it defaults to the number of rows on the screen, and if Col is not specified it defaults to the number of columns on the screen. |
| Box(y/n) | For a box around the window enter y. Use n if you do not want the box. There is no default for this field: you must enter a value. |
6.4.1 Form Name and Form Instances
Using form instances permits you to associate sets of windows with various
versions or copies of a form. Each version or copy carries its own field
values. Each window associated with a form instance gives access to the
field values defined for that form instance.
Fields are usually referred to by window and field name. The syntax is:
'window'@'field_name'
where:
| window | is the name of the window. |
| field_name | is the name of the field, optionally followed by a field number enclosed in square brackets ([ ]). If no field number is given, the field number 1 is assumed. For instance, names@name and names@name[1] refer to the same field. |
Suppose we have the form nameform with the following windows into it:
Table 6-3
| Windows into Nameform | ||
| Window | Form Instance | Form |
| window1 | instance1 | nameform |
| window2 | instance1 | nameform |
| window3 | instance2 | nameform |
Then, for the field address in the form nameform, window1@address is always equal to window2@address, but window3@address is independent of the other two values.
 Figure 6-5 Field Table
The Select function selects records based on the Window Name and Field Name fields. If both fields are empty, all fields are selected. If only the window is specified, all fields for that window are selected. If only the field name is specified, all fields with that name are selected.
An application can have many windows, each showing a form with many fields. Not all these fields need to be defined. You must define a field only if one of the following applies:
Table 6-4
| Fields | |||||||||||||
| APPLICATION | Shows the name of the application for which you are defining the field. | ||||||||||||
| Window Name | The name of the window in which the field appears. | ||||||||||||
| Field Name | The name of the field. The name should not be prefixed with the name of the window. | ||||||||||||
| Number | Requires a number to identify a specific field in a multi-field. For the single field, or, if no number is necessary, the user must enter the value zero (0) to proceed. | ||||||||||||
| Mode | Determines the degree of access to a field. This can assume one of
three values described in the following table.
Table 6-4a
|
||||||||||||
| Data Type | Determines the data type of the field,, defining how the contents of the field are to be treated in an expression. A field's data type does not restrict the use of the field for keyboard input or the display of data. Any data can be keyed into a field of any type, and any data can be displayed in a field of any type. The following table summarizes the formats expected by Empress 4GL during evaluation of expressions. | ||||||||||||
Table 6-5
| Data Types | |
| Type | Description |
| CHAR | A sequence of letters, numbers or other symbols. For example, abcde12345xyz. |
| DATE | A date in a format acceptable to Empress, if you intend to do date arithmetic. |
| DECIMAL | A sequence of digits, followed by a decimal place and trailing digits. For example, 12345.678. |
| FLOAT | Also known as scientific notation. A digit followed by a decimal point and trailing digits, followed by e and an exponent of 10. For example, 1.2345e2. |
| INTEGER | A whole number. For example, 5. |
| Empress_type | Any Empress built-in data type expressed as "ms data type [(parameter {,parameter})]". The data types are: BULK, CHAR, DATE, DECIMAL, DOLLAR, FLOAT, INTEGER, LONGFLOAT, LONGINTEGER, SHORTINTEGER, TEXT, and TIME. They are described in the Empress SQL Reference manual. |
If the data type is unspecified, it is assumed to be CHAR.
If several fields have the same name they will all have the same data
type. If the data type for a field is specified, it must be in an entry
for the field name without a field number.
| Previous Field | The field that will be entered when the Field Editor's Previous field key is pressed. This field must be in the same window as that of the current field: the name should not be preceded by the window name. This is used to override the default tabbing order of right-to-left and bottom-to-top of the form. |
| Previous Number | In addition to a field name, a field number may be specified between the square brackets. If no field number is entered, the next field entered during execution will be the one with the same number as the current field; if there is no such field then the field with number 1 is entered. The symbols "+" and "-" can be used in place of a field number to specify that the previous field's number is to be the current field number plus or minus 1, respectively. |
| Current Field | This field and the Field Name field update each other on tabbing out. |
| Current Number | A field number may be specified between the square brackets. If no field number is specified, the field definition applies to all fields having the field name. A field definition that includes a field number takes precedence over one that does not. |
| Next Field | The field that will be entered when the Field Editor's Next field key is pressed. This field must be in the same window as that of the current field; the name should not be preceded by the window name. This is used to override the default tabbing order of left-to-right and top-to-bottom of the form. |
| Next Number | In addition to a field name, a field number may be specified between the square brackets. If no field number is entered, the next field entered during execution will be the one with the same number as the current field; if there is no such field then the field with number [1] is entered. The symbols "+" and "-" can be used in place of a field number to specify that the next field's number is to be the current field number plus or minus 1, respectively. |
| Range | The allowable range of values for the field. (Refer to the Empress SQL Reference manual under "CREATE RANGE CHECK" for the syntax.) |
| Save Name | The name that identifies the saved value for the field. It is use to allow two or more fields to use the same saved value or to allow two or more fields with the same name but different field numbers to have their own save values. The save name defaults to the name of the field. |
| Default | The default value for the field. (See the reset_fields commands.) |
| Enter Script | The enter script for the field. You may fill in any instructions to be executed when the field is entered. |
| Exit Script | The exit script for the field. You may fill in any instructions to be executed when the field is exited. |
6.6 Key Scripts
On the Tables Menu, if you press the key labelled Key,
you will be shown the following screen:
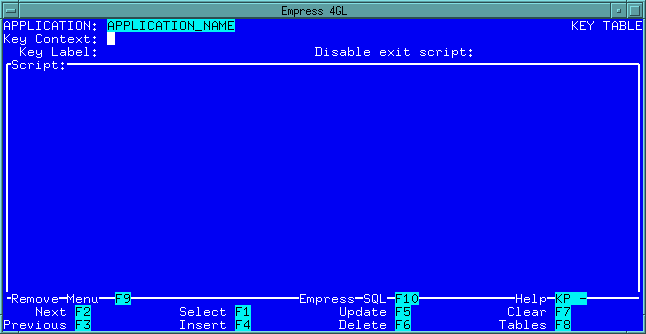 Figure 6-6 Keys Table
The Select function chooses records based on the Key Context and Key Label fields. If both fields are empty, all key scripts are selected. If only the key context is specified, all key scripts for that key context are selected. If only the key label is specified, all scripts associated with that key label are selected.
Table 6-6
| Fields | |
| APPLICATION | Holds the name of the application for which you are defining a function key. |
| Key Context | The name of the key context for which the key is being defined. If
this is the same as a window name, then this key context will be attached
to the window if no other key contexts are specified in the window definition.
A key context becomes active as the window to which it is attached becomes current. The scripts defined in the key context are executed when the key context is active, and also when the function keys mapped to the respective key labels are pressed. Since a window can have several key contexts attached to it, the key contexts for a window are kept as a stack keys defined for contexts higher in the stack override keys in contexts lower in the stack. The key contexts active in a window remain active while the window is the current window. Making another window current clears the active key context stack. See the script functions push_key_context and pop_key_context for additional control over key contexts in a window. |
| Key Label | this must be a label that is mapped to a physical key on the terminal where the application is to run. The mapping of names to keys is defined in the Empress 4GL system tables described in the Terminals appendix. In the terminal configurations supplied with Empress 4GL, the names AP_1 to AP_10 are always mapped to physical keys and are available for use. If you have not re-configured your terminal, you can use these names. If you have done your own terminal configuration, then you should look in the system tables to find out the names you should use. |
| Disable exit | Placing a y in this field will cause the exit script |
| script | For the current field, if any, to be disabled when the key is pressed.
This guarantees that the key script will be executed.
Placing a n or leaving the field empty means that when the key is pressed, the exit script for the field, if any, will be executed before the key script. |
| Script | The script for the key. |
6.7 Subscripts
If you press the Script key given on the Tables Menu,
you will be shown the following screen:
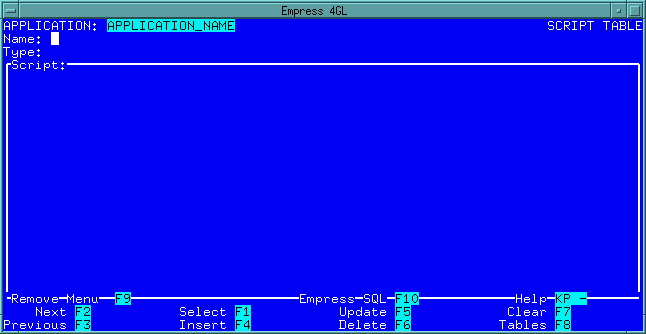 Figure 6-7 Script Table
The Select function chooses records based on the Name field. If the field is empty, all scripts are selected.
An application can have many named scripts. These scripts, sometimes called subscripts or procedure scripts, can be referenced by commands in other scripts. You may think of these scripts as making up a library of commonly used instruction sequences that are recorded separately for convenience. Whenever one of these scripts is called by name, the instructions in the script are executed.
Table 6-7
| Fields | |
| APPLICATION | Holds the name of the application for which you are writing the subscript. |
| Name | Name of the script. Each script in an application must have a unique name. |
| Type | You can write the script so that it returns a value. If so, the data type of the value must be declared. This can be CHAR, DATE, DECIMAL, FLOAT, or INTEGER. If the type is undefined it is assumed to be CHAR. |
| Script | The script. |
6.8 Edit Forms
The form option on the Tables Menu brings up a list of
forms defined in the application and allows you to tab into a form name
to edit it.
The list of forms displayed is not the full list of forms in the database, as is the case in the Form Manager entered through Empress 4GL's Main Menu. The list is of forms specifically associated with the application currently being edited.
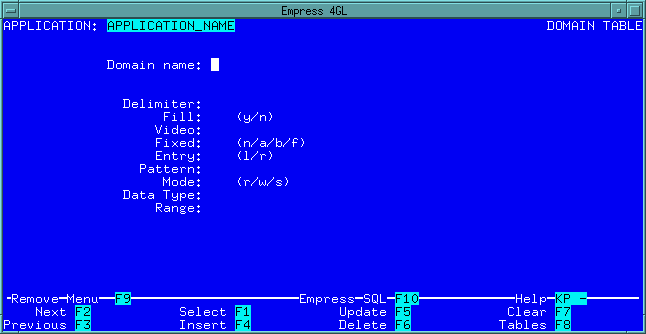 Figure 6-8 Domain Table
The Select function chooses records based on the domain name field. If the field is empty, all domains in the application are selected.
Table 6-8
| Fields | |
| APPLICATION | Shows the name of the application for which you are defined domain. |
| Delimiter | The delimiters (framing characters) for the field display. |
| Fill | Selects whether the field is to be filled that is, whether underscores will occupy empty spaces in the field display. The value can be y (fill) or n (no-fill). |
| Video | Determines the way the field is shown on screen. On monochrome terminals this can usually be normal or reverse. On color terminals available colors can be specified. |
| Fixed | The fixed size field flag, which limits the length of a field to the length of the field display. It can be n (normal), f (fixed, excess characters overwrite), b (fixed, beep on excess character), or a (fixed: an excess character causes auto skip to the next field). |
| Pattern | The edit pattern for the field, which provides several options for the entry and display of numbers, characters, and dates. |
| Mode | Determines the degree of access. It can be r (read only), w (read and write), or s (skip). |
| Data Type | The data type, defining how the contents of the field are to be treated in an expression. Allowable types include CHAR, DATE, DECIMAL, and INTEGER. |
| Range | The allowable range of values for the field. |
6.10 Compile Application, Link Application, Run Application
The compile option on the Tables Menu compiles your application.
You must compile and link your application before you
can run it.
The link option on the Tables Menu links your application. You must link your application before you can run it. The application is linked with any applications listed in the Link Applications list on the second page of the Application Table entry. Linking applications does not nest, that is, if application a links application b and application b links application c, application a will not have application c linked to it.
The run option on the Tables Menu loads your application and runs it. The application must have been previously compiled and linked. When you quit the application, you will return to the Script Editor.
Leaving the Script Editor will return you to the Applications Manager.