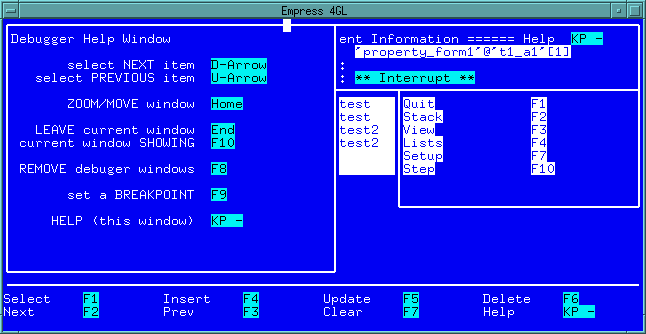
 Figure 9-1 Debugger Help Window
The Empress 4GL Source Debugger is a programming tool that is used to determine where and why runtime errors are occurring. Other types of software errors are normally detected when a program is compiled and/or linked.
Debuggers work by allowing the execution of a program to be stopped at various times. The current location within the program is available in the form of a stack trace. The values of variables can then be viewed or changed or the source code examined. The execution can then be continued or even single stepped. This allows you to determine where the variables are set to the wrong values or when the wrong branch of code is executed.
The Source Debugger is menu driven and uses windows to display information for the programmer. It behaves as a normal Empress 4GL application so it is very easy to learn and use.
There are several windows which allow you to look at different parts of the application that is being debugged. The applications, windows, key contexts, fields and scripts can all be examined. The table instances involved may be looked at as well as the attribute values of the current record for any instance. All system and application variables, fields and attributes can be displayed and/or modified. A window may be set up to display the values of variables, fields or attributes as the application progresses.
To control the application execution, there are breakpoints which can be set upon entry of a procedure, reaching a certain line in a script or changing the value of a variable. Also, single stepping is available to execute the application one line at a time and the <Interrupt> key can be used to halt the application and enter the debugging windows.
There is even a setup feature which allows the display of windows to be tailored to meet your specific needs. This setup can be saved in a file for future use.
Errors that cause the application to enter the debug environment include all Empress error conditions as well as any conditions that cause an error_message call to be executed.
There are several types of breakpoints which can be used in the Empress 4GL Source Debugger.
9.3 General Functions
All of the normal Empress 4GL field functions are available
within the Source Debugger environment. There are also some special functions
which are part of the Source Debugger that are helpful to learn. These
functions are available regardless of which menu is active at the time.
One of the most important functions is the Help function which
will display a list of the functions that are being described in this section.
This function replaces the normal Empress 4GL Help
function with Source Debugger specific help.
Figure 9-1 Debugger Help Window
There will be a list of items within most of the windows in the application. Only one of them is current and it will usually be highlighted, but, the Select Next Item and Select Previous Item keys can be used to move through the list.
 Figure 9-2 Breakpoint windows
The functions relating to breakpoints will be discussed in detail in the next section.
For any window that is available in the Source Debugger, it is possible
to alter the size and/or position of the window to suit your needs. When
you issue the Zoom/Move Window function, the following menu is
displayed. This menu outlines the functions for zooming a window. The functions
for moving the window are on another menu which is displayed by the Move
Window function.
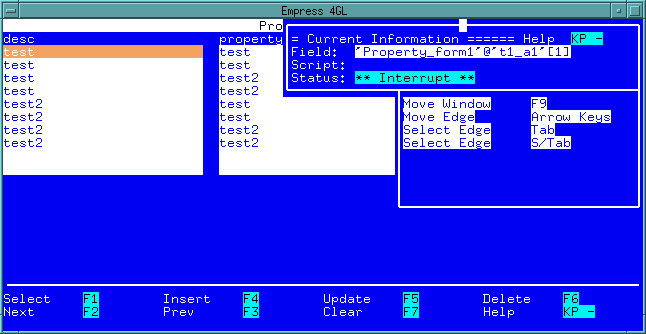 Figure 9-3
In order to zoom (re-size) a window, one of the sides of the window that is being zoomed will have the cursor on the middle of it. The Select Edge function keys can be used to move the cursor to the other edges of the window. Once the edge that is to be moved is selected, the Move Edge keys can be used to determine where that edge will be placed. Note the edge is not actually moved, only the cursor. The Quit function key is used to tell the Source Debugger where the edge is to be made. At this time the window will be re-sized.
Keep in mind that you cannot make the window larger than the physical screen and it cannot be placed outside the boundaries of the screen.
The functions used to move a window are simple. The top left hand corner
of the window will have the cursor on it. Use the Move Window
keys to move the cursor to the position at which the upper left hand corner
of the window will be. Pressing the Quit key will then move the
window. Note once again that the window cannot be moved off the screen.
 Figure 9-4
Both the Leave Current Window and Current Window Showing functions will return to the previous window. However, the first function will remove the window before passing control back. The second function will leave the window visible. The Current Window Showing is intended to be used for the View window so that it can be left visible while the application is single stepped or continued.
The Remove Debugger Window function will remove all the Source Debugger windows from the screen. They will still be active, but not visible. This allows you to see what the application windows look like while in the Source Debugger. Pressing the same key will bring the windows back.
This section will describe each of the screens which are available as well as the functions that can be performed in each. Note that all the windows in the figures are in their normal default locations unless otherwise specified.
The names in parentheses are used in the Setup function to refer to each window.
When first entering the Source Debugger environment the Status window and Main Menu are displayed.
 Figure 9-5 Status Window
The field name is in the standard Empress 4GL format for a field, i.e., `window'@`field'.
The script may either be blank or it may have the name of the script present. For key scripts the key label is used as the name. Field enter and exit scripts are named by the field name. For the application enter and exit scripts the name of the application is used. The script name will also have the current line number.
For example, if the application was halted in the AP_5 key script at line 7 the script would be "AP_5 line 7".
If in the enter or exit script of field_test, the script line reads field_test line 3. This indicates that it was halted on line 3 of the enter or exit script of field_test.
The Status field indicates why the application was halted. It can have one of four different values.
[2] - variable `var_1'.
The Main Menu is displayed as soon as you enter the Source Debugger environment. It displays the functions that are available to you. These functions are described in the following sections.
The Quit function is used to exit from the application as well as the Source Debugger. It will return to the Empress Application Development environment. To exit from the Source Debugger back to the application that is being debugged you should use the normal Empress 4GL Quit key.
The top of the list will be the current script with the one that called it being underneath it and so on.
The Stack window also gives detailed information about each script. Along with the line number, it explicitly defines the procedure.
For the application enter and exit scripts the keyword APPLICATION is used as well as ENTER or EXIT. The actual application name is in quotes. For example:
application 'timelog' enter line 15
 Figure 9-6 Stack Trace Window
The key scripts are identified by the key context and key label which are separated by a dash, such as:
`key_context'-`AP_1' line 7Field scripts are identified by the field name:
`window'@`field' formatand either of the keywords ENTER or EXIT, for example:
`form1'@`name' exit line 1Subscripts are indicated simply by placing the name in quotes with parentheses following. If there are any arguments passed to the script they will be displayed within the parentheses. For example:
`hypotenuse' (8, 4) line 3Finally, an item on the stack could be the application itself. All application calls will have two asterisks followed by the application name in quotes and parentheses containing any parameters which may have been supplied, for example:
** `timelog' ()
The menu will also be changed to reflect the options available. There is only one option, Source, which will display the Source window with the currently highlighted script in it. Note that although the Stack Trace window is initially displayed with the current script highlighted, the Select Next Item and Select Previous Item keys can be used to move throughout the list. Keep in mind that the actual application itself has no source to be displayed.
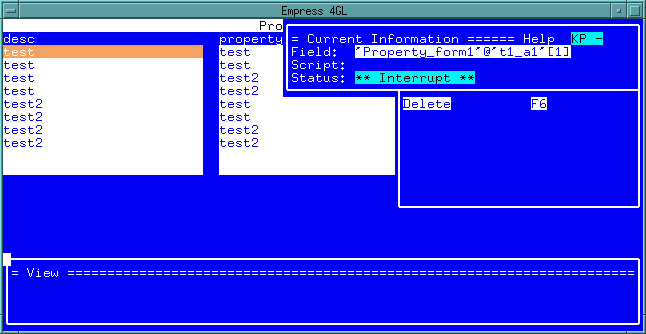 Figure 9-7 View window
The menu for the View window contains only one function, the Delete function. This will remove the currently highlighted variable from the display. To add a variable to the View window see the sections on the Attributes window, Variables window and Fields window.
To return to the Main Menu without removing the View window, use the Current Window Showing function.
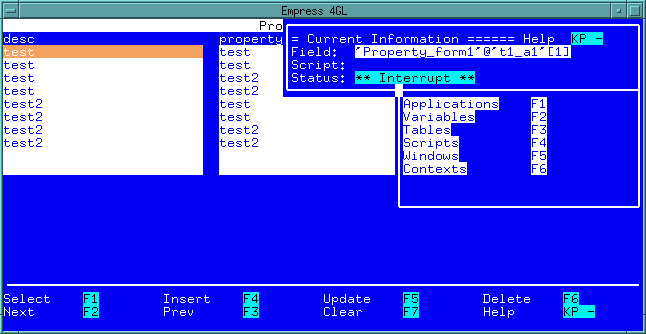 Figure 9-8 List Menu
9.4.2.5 Step
Single stepping is a valuable debugging tool. It allows you to execute
the application one line at a time and to watch how things change during
the execution of the code at each step. This function will execute one
line of application code and then return to the Source Debugger environment
(the status will be Single Step).
The Source Debugger windows (except for the View window if it is visible) will be removed while the line of code is executed so that the entire screen is visible during the execution.
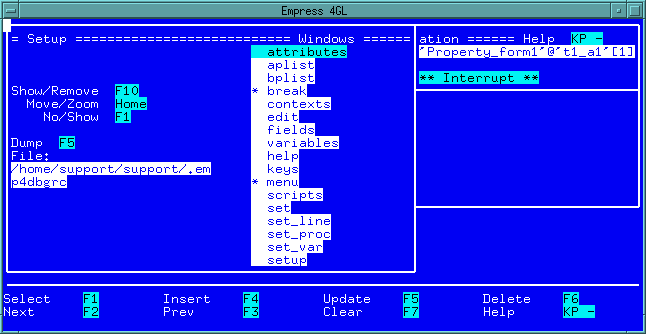 Figure 9-9
The windows that are available in the Source Debugger environment are listed along the right hand side of the Setup window. There will be an asterisk beside each of the windows that will be visible upon entry into the Source Debugger environment. Note that the Main Menu and Status window are the default windows. This can be changed for any of the windows using the No/Show function key when the name of the window is highlighted.
It is also possible to display any of the windows in order to see how they will appear on the screen using the Remove/Show function. You can then use the Move/Zoom function to move and/or re-size the window. This will cause the window to be displayed in that position and size from that point on in the debugging session.
You may also save a Definition for future sessions. The Dump function is used to accomplish this. All the information regarding the window setup will be stored in a file which will be used each time the Source Debugger environment is entered.
The setting of breakpoints is an important function of any Source Debugger. The Empress Source Debugger has several windows that allow the setting and unsetting of breakpoints. To enter these windows you must use the Set Breakpoint function.
A breakpoint can be set directly from this window by typing in the appropriate
Definition and Condition. When these fields are appropriately
filled in, the Set function can be used to put the breakpoint
into place.
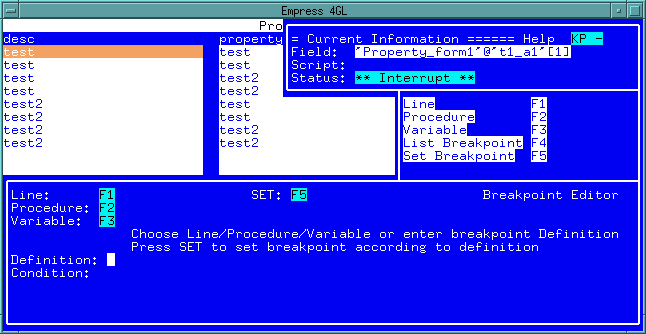 Figure 9-10
However, if you do not wish to type in the extra information required for each type of breakpoint then you may use the line, procedure or variable functions to call up windows in which to enter the values. These windows will then put the appropriate data into the Definition and Condition fields.
Note
You must remember to set the breakpoint after it has been defined.
The final function that is available from the Set window is the List Breakpoint. It will call up the Breakpoint List window described in a later section.
The Condition field on this window allows you to specify that the breakpoint is only to be used if a certain condition is true. For example, if a breakpoint is set on a line within a loop, you do not want the execution to halt for every iteration within the loop, therefore you would enter a condition such as i 80 to indicate that the breakpoint is to be ignored otherwise. (This example assumes that i is incremented at some point within the loop and will eventually exceed 80).
line 5 script `test1'if the breakpoint is to be set on the fifth line of the test1 subscript.
Notice that the script name is in quotes. The format for a subscript name is always:
`<subscript>'For field scripts the format is:
`<window>'@`<field>' enter (or exit)Key scripts are formatted as:
`<key context>-<key label>'and application enter/exit scripts as:
application `<name>' enter (or exit)These formats also apply for the procedure breakpoints in the next section.
The Set Line window allows you to enter in the name of the
procedure and the line number. When the Quit function is pressed
the Definition field will be filled in with the appropriate definition.
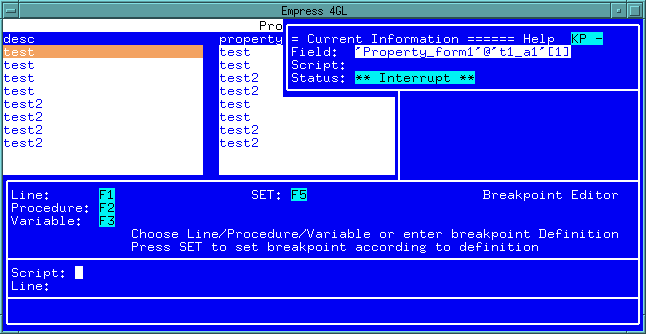 Figure 9-11 Set Line Window
9.4.3.3 Set Procedure (set_proc)
Setting a procedure breakpoint is similar to setting a line breakpoint
except that the line number is assumed to be 1 so it is not necessary to
enter it. The format of a definition for a procedure definition is:
call <proc>where <proc> is the name of the procedure in the appropriate format. The keyword call is optional and will be assumed.
This can be entered directly into the Definition field on the
Set window or you can access the Set Procedure window
and enter just the name of the script there. When you press the Quit
key the definition will be placed into the Definition field.
 Figure 9-12
For both the procedure and line breakpoints it is possible to have the information filled in automatically by the Source Debugger. You can list the source for the appropriate script and then enter the breakpoint windows by using the Set Breakpoint function. When the Line or Procedure functions are executed, appropriate information such as the script name will be automatically entered. Quit will then create the appropriate Definition field and the Set function will set the breakpoint.
variable <var>This can be simplified by using the Variable function and entering the name of the variable on the Set Variable window.
 Figure 9-13 Set Variable Window
9.4.4 Breakpoints List Window (bplist)
In conjunction with setting breakpoints, it is also important to see what
breakpoints have already been set and to be able to remove them. To perform
these operations you must use the List Breakpoints function in
the Set window. It displays a window with a list of all the breakpoints
that have been set. The Select Next Item and Select Previous
Item keys allow you to move through the list, highlighting different
breakpoints. The Delete function can then be used to remove the
highlighted breakpoint from the list.
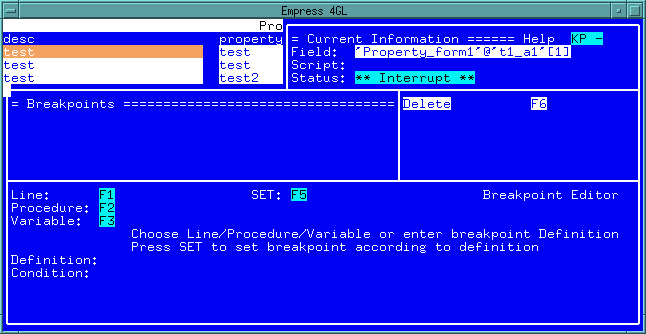 Figure 9-14 Breakpoints List Window
9.4.5 Variables Window (variables)
The List function of the Main Menu allows you to list
the variables that are currently active in the application. This is accomplished
by selecting the Variables function. A list of variables along
with their current values will be displayed in the Variables window.
This list will include all global and external variables as well as the
local variables for the script in which the application was halted.
One of the variables will be highlighted and you can move through the
list using the Select Next Item and Select Previous Item
keys.
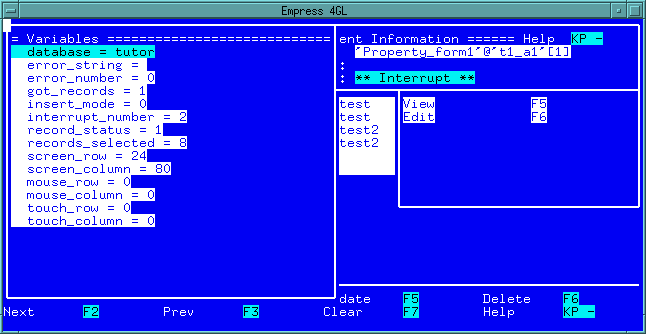 Figure 9-15 Variable Window
The value of the highlighted variable can be edited using the Edit function. This will place the value of the variable in a small window where it can be edited using the normal Empress 4GL editing functions. Once the value is changed the normal Quit function will update the variable. This can be used to determine how an application will react to certain values or to bypass an error caused by an incorrect value.
As well, the highlighted variable may be placed in the View window by using the View function. The value of the variable will then be tracked as the debugging session continues.
There is also a menu associated with the Tables window which
allows you to call up the Attributes window for the currently
highlighted table instance.
 Figure 9-16 Tables Window
9.4.7 Attributes Window (attributes)
In this window you can view the current value of all the attributes in
the table instance. The menu for the Attributes window has two
available functions, Edit and View.
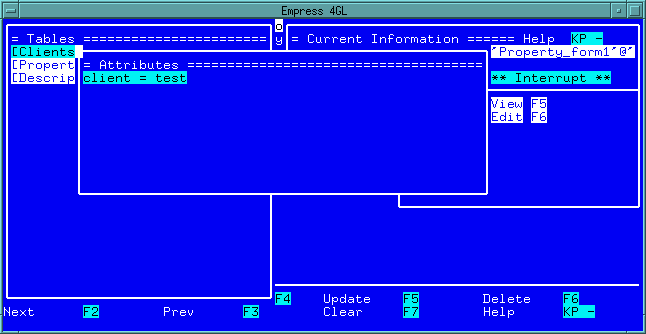 Figure 9-17 Attributes Window
The value of the highlighted attribute may be changed by using the Edit function. This will provide a small window in which the current value is placed and can be edited using the normal Empress 4GL editing functions.
The View function will place the highlighted attribute into the View window so that its value may be monitored as the application continues.
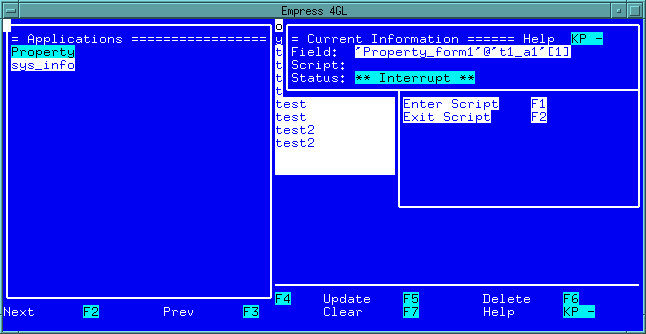 Figure 9-18 Applications Window
There are two options on the menu which are associated with the Applications window. The Enter Script function displays the Source window with the application enter script in it. Similarly, the Exit Script function displays the source of the application exit script.
Within a window there are two items which can be displayed. The first
is a list of the fields on the window (use the List Fields key).
The second is a list of key contexts (use the List Contexts key)
that are on the key context stack for the window. The windows that are
brought up by these functions are described in more detail in the following
sections.
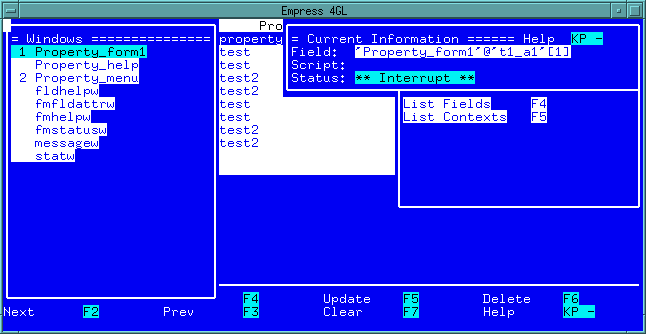 Figure 9-19 Windows Window
9.4.10 Fields Window (fields)
The Fields window is only available by using the List Fields
function from the Windows window. It will display all the fields
that are on a specified window as well as the values they were set to at
the time the application was halted.
The enter and exit scripts of each field can be displayed in the Source window, the Enter Script or Exit Script functions. The field can be selected using the Select Next Item and Select Previous Item keys.
As well, the View function can be used to put the field into the View window so that it can be tracked.
The Edit function allows you to change the value of the current
field in the same way that variables and attributes can be edited.
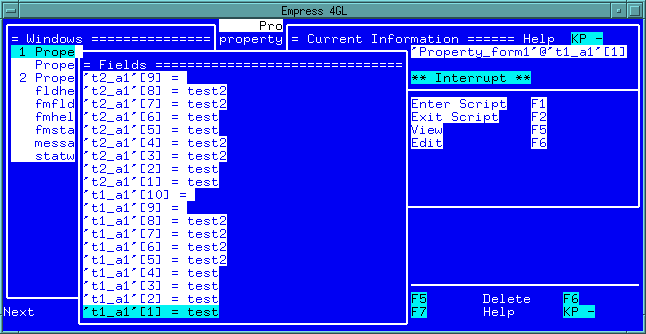 Figure 9-20 Fields Window
9.4.11 Contexts Window (contexts)
An Empress 4GL window may have key contexts associated with
it as well. If the List Contexts function is pressed in the Windows
window then the key contexts that are on the key context stack for the
highlighted window will be listed in the Contexts window. The
Contexts window can also be accessed directly from the List
Menu where all the key contexts in the application will be listed.
The list also indicates the position of each context on the stack at the
time the application was halted.
From the Contexts window you may call up the Keys
window for the highlighted context using the List Keys function.
The Keys window will be described in the next section.
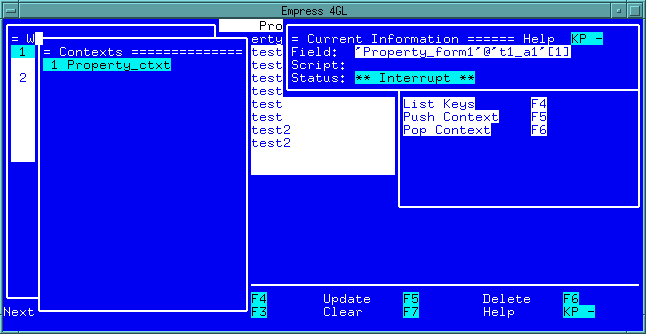 Figure 9-21 Context Window
You have the option of pushing on or popping off key contexts from the stack by using the Push Context and Pop Context functions.
Using the Select Next Item and Select Previous Item
keys, you can select one of the keys. Its source can then be displayed
in the Source window by using the Source function.
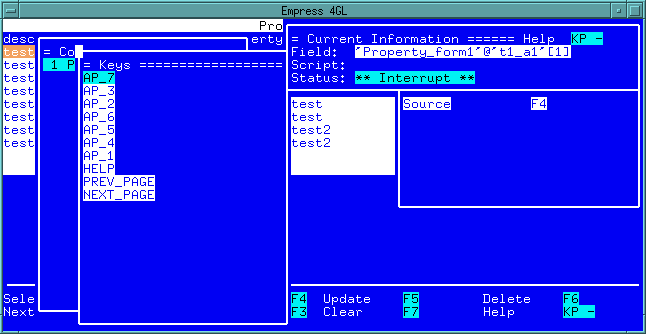 Figure 9-22 Keys Window
9.4.13 Scripts Window (scripts)
The last list that is available is the list of subscripts. All the subscripts
in the application will be listed and one may be selected by using the
Select Next Item and Select Previous Item keys. The source
for any script can be displayed using the Source function which
calls up the Source window.
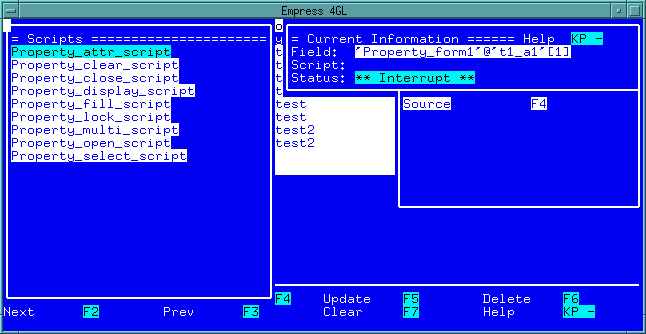 Figure 9-23 Scripts Window
9.4.14 Source Window (source)
The Source window is accessed by any window which lists items
that have a source code. It will display the source code for the selected
procedure. Any line of the source code can be selected using the Select
Next Item and Select Previous Item keys.
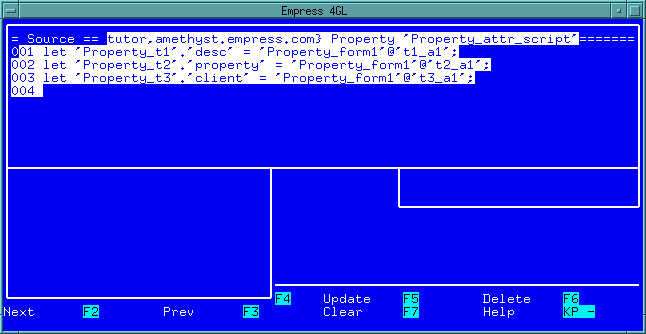 Figure 9-24 Source Window
9.4.15 Edit Window (edit)
An example of the Edit window can be seen in the Variable
window section. It is used to edit the value of a variable, attribute or
field (see the appropriate section for details).
9.4.16 Help Window (help)
The Help window is explained in detail in the previous chapter
on "General Functions".