| |
| Empress ODBC Driver for MS Windows |
| ODBC Client on UNIX |
| Empress ODBC Driver for UNIX (shared library or an archive library file) |
|
Connectivity (ODBC) Server on MS Windows and UNIX |
| Empress RDBMS |
| Empress Connectivity (ODBC) Server |
ODBC Client side
| |||||
Connectivity (ODBC) Server side
|
The following configuration for the ODBC Local Access scenario is needed
(there is no need for a server):
ODBC Client side
|
Empress ODBC Driver for Windows is included in every formal released product of Empress RDBMS. To install the Empress ODBC Driver, insert the Empress product CD into the Windows cdrom driver, the installation will start automatically. If the installation does not start automatically, the program can be started manually.
Empress ODBC Local Access Driver for Windows is included in Empress RDBMS for Windows.
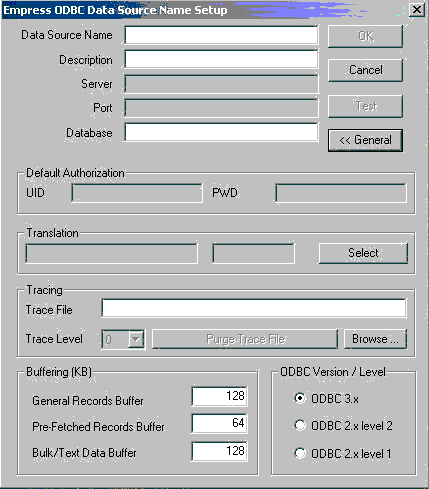
| Data Source Name | Defines ODBC data source name. |
| Description | Defines the description for the data source. |
| Server | Defines a domain name or IP address of the server machine. This field is disabled for ODBC Local Access Data Source. |
| Port | Defines an ODBC service port number. This field is disabled for ODBC Local Access Data Source. |
| Database | Defines a logical database name or physical full Empress database path. The logical database name must be mapped in the Connectivity (ODBC) Server configuration file and only can be used for ODBC Client/Server Scenario. |
| UID | Defines default login name. |
| PWD | Defines default password. |
| Translation | Defines the ODBC driver translation library. |
| Trace File | Defines the ODBC driver trace file.
|
| Trace Level | Define the trace level (1-3). The trace level will be used to control the trace message. The larger number generates more detailed message. |
| ODBC 3.x | Setting this box, causes Empress ODBC Driver to conform to Microsoft ODBC 3.52 Standard. Empress strongly suggest user to set this option. |
| ODBC 2.x Level 2 | Setting this box, causes Empress ODBC Driver to conform to Microsoft ODBC 2 Standard. |
| ODBC 2.x Level 1 | Setting this box forces the Empress ODBC Driver to perform as an ODBC Conformance Level 1 Driver, according to Microsoft ODBC 2 Standard. |
| General Records Buffer | Defines the size of the memory cache for storing fetched records. If this size is not sufficient to store fetched records, a file will be used to store them. If "Pre-Fetched Records Cache" value is greater than "General Records Buffer" value, pre-fetched records will be stored in the file. |
| Pre-Fetched Records Cache | Defines the size of the space used for storing records in advance when SQLFetch is used. |
| Bulk/Text Data Buffer | Defines the size of the cache for Bulk/Text attributes data, only to be used when SQLGetData is invoked (e.g. not relevant for SQLBindCol). |
Empress provides empocc utility to help user compile their ODBC client program. If you would like to use Empress Local Access, use empocc -bcs (using this option will bypass Empress ODBC client server mechanism and access the Empress local database directly). For detailed information, please reference empocc command.
Empress ODBC Library is installed while installing the Empress product. It usually does not need to be installed separately.
The ODBC database is defined in ODBC Data Source file. The default data Source file name is odbc.ini. It should be located in the same directory where the ODBC program is started. The user can also use an Empress variable MSODBCINIFILE to define the name and location of ODBC Data Source file.
Here is the sample odbc.ini file,
[Data Source Name]
DESCRIPTION=
SERVER=
PORT=6322
DATABASE=
TRACEFILE=
TRACELEVEL=
DEFAULTPWD=
DEFAULTUID=
ODBCLEVEL=
ODBCVERSION=
CACHE_SIZE=65536
CACHE_BTSIZE=131072
CACHE_FSIZE=131072
where:
| Data Source Name | Defines ODBC data source name. |
| DESCRIPTION | Defines the description for the data source. |
| SERVER | Defines a domain name or IP address of the server machine. For ODBC Local Access, the value of SERVER is LOCAL. |
| PORT | Defines an ODBC service port number. This field is ignored for ODBC Local Access Data Source. |
| DATABASE | Defines a logical database name or physical full Empress database path. The logical database name must be defined in the Connectivity (ODBC) Server configuration file and only can be used for ODBC Client/Server Driver. |
| DEFAULTUID | Defines default login name. |
| DEFAULTPWD | Defines default password. |
| TRACEFILE | Defines the ODBC driver trace file.
|
| TRACELEVEL | Define the trace level (1-3). The trace level will be used to control the trace message. The larger number generates more detailed message. |
| ODBCVERSION | Defines the version of Microsoft ODBC Standard which Empress ODBC Driver to conform to. It can only be set to 03.52 or 02.50. Empress suggest the user to set ODBCVERSION to 03.52. |
| ODBCLEVEL | Sets the level of Microsoft ODBC Conformance Level which the Empress ODBC Driver to perform. It can only be set to 1 or 2 when ODBCVERSION is set to 02.50. It is ignored when ODBCVERSION is set to 03.52. |
| CACHE_FSIZE | Defines the size of the memory cache for storing fetched records. If this size is not sufficient to store fetched records, a file will be used to store them. If "Pre-Fetched Records Cache" value is greater than "General Records Buffer" value, pre-fetched records will be stored in the file. |
| CACHE_SIZE | Defines the size of the space used for storing records in advance when SQLFetch is used. |
| CACHE_BTSIZE | Defines the size of the cache for Bulk/Text attributes data, only to be used when SQLGetData is invoked (e.g. not relevant for SQLBindCol). |
  setenv EMPODRV_TRACELEVEL 2
  setenv EMPODRV_TRACEFILE ./drv2.log
will set the trace level to 2, and trace file to drv2.log for that session.
Empress provides empocc utility to help user compile their ODBC client program. If you would like to use Empress Local Access, use empocc -bcs (using this option will bypass Empress ODBC client server mechanism and access the Empress local database directly). For detailed information, please reference empocc command.
It is assumed that you have already installed the Empress RDBMS.
Create and set the users to access the Connectivity (ODBC) Server in an Empress password file using the utility emppassword.
emppassword -f password_file create
emppassword -f password_file add user_login_name
Set up the Network Server
Configuration File (netserver.cfg).
The default
netserver.cfg is:
EMPRESSPATH/config/netserver.cfg
    MSNETSERVER
    :
    : common
    :
        NAME=empodbcsv
        TYPE=odbc
        HOST=localhost
         ....
        SECURITY_CHECK_PASSWORD=
    :   SECURITY_PASSWORD_FILE=location_of_password_file
         ....
    MSNETSERVEREND
    MSNETSERVER
    :
    : common
    :
        NAME=empodbcsv
        TYPE=odbc
        HOST=localhost
         ....
     :  SECURITY_CHECK_PASSWORD=
        SECURITY_PASSWORD_FILE=location_of_password_file
         ....
    MSNETSERVEREND
MSNETSERVERCONFIGFILE=netserver.cfg
Notes:
setenv MSNETSERVERCONFIGFILE new_netserver.cfg
MSCONFIGFILEPATH="$HOME/.empress;$HOME;${EMPRESSPATH}/config"setenv MSCONFIGFILEPATH "newpath"
SECURITY_PASSWORD_FILE=/etc/password Optionally create the Empress Connectivity (ODBC) Server Configuration File if you need to change the defaults of Connectivity (ODBC) Server Configuration.
Start the Empress Connectivity (ODBC) Server by using the following command on the server side.
$EMPRESSPATH/bin/empsvadm odbc_server_name start -f odbc_server_configuration_file
The odbc_sever_name is the name of the Connectivity (ODBC) Server, set in Network Server Configuration File as NAME.
The default Connectivity (ODBC) Server name is empodbcsv.
(Note that you need to
specify the -f odbc_server_configuration_file only if you
have created Empress Connectivity (ODBC) Server Configuration File in previous step)
Note: Empress only allows one Empress Connectivity (ODBC) Server to run on each server machine.It is suggested that the database administrator starts the Empress Connectivity (ODBC) Server on the server platform. This is necessary to maintain a level of protection for the Empress RDBMS files and prevent unauthorized access by ODBC client applications to Empress RDBMS files belonging to other users.
The administration of Empress Connectivity (ODBC) Server is explained in a separate manual. Please refer to [Empress Servers] for a complete information about usage of Empress Servers and specifically Empress ODBC (Connectivity) Server.
$EMPRESSPATH/odbccl/exampleafter the successful Empress Installation.
Here are the basic steps for each application:
main () {

    short   i;
    char    valsr[STRING_LEN];
    long    vallr;
    RETCODE err;

    /* Environment allocation */
    check("SQLAllocEnv",SQLAllocEnv(&henv));

     /* Data Base Connection allocation */
     check("SQLAllocConnect",SQLAllocConnect(henv, &hdbc));

      /* Establish a connection to a Data Source */
      /* NOTE: You must specify [empress] data source section in odbc.ini file */
     check("SQLConnect",SQLConnect(hdbc, (UCHAR FAR *)"empress", SQL_NTS,
                           (UCHAR FAR *)LOGINNAME, SQL_NTS, (UCHAR FAR *)"", SQL_NTS));

     /* Statement allocation */
     check("SQLAllocStmt",SQLAllocStmt(hdbc, &hstmt));

     /* Create a test table t with couple records */
     check("create t (ID longinteger, name char)",SQLExecDirect(hstmt,
            (UCHAR FAR *)"create t (ID longinteger, name char)", SQL_NTS));
     check("insert into t values (1, 'ana')",SQLExecDirect(hstmt,
            (UCHAR FAR *)"insert into t values (1, 'ana')", SQL_NTS));
     check("insert into t values (2, 'fred')",SQLExecDirect(hstmt,
            (UCHAR FAR *)"insert into t values (2, 'fred')", SQL_NTS));
     check("insert into t values (3, 'bill')",SQLExecDirect(hstmt,
            (UCHAR FAR *)"insert into t values (3, 'bill')", SQL_NTS));

     check("SQLBindCol",SQLBindCol(hstmt, 1, SQL_C_LONG, &vallr, 0, &cbLenL));

     /* Assign the storage and data type for the second column in a result set */
     check("SQLBindCol",SQLBindCol(hstmt, 2, SQL_C_CHAR, valsr, STRING_LEN, &cbLenC));


     /* retrieve records from table t */
     check("select from t",SQLExecDirect(hstmt, (UCHAR FAR *)"select from t", SQL_NTS));

     i=1;
     while (1)
        {
             /* Fetch records */
             check("SQLFetch", err = SQLFetch(hstmt));
             if (err) break;

             /* print table attributes from each fetched row */
             printf("Row %d .. ID: %ld Name: \"%s\" \n", i++,vallr,valsr);
        }


     /* Drop a test table t */
     check("drop table t",SQLExecDirect(hstmt, (UCHAR FAR *)"drop table t", SQL_NTS));

     /* Free Statement allocation */
     check("SQLFreeStmt",SQLFreeStmt(hstmt, SQL_DROP));

     /* Disconnect status */
     check("SQLDisconnect",SQLDisconnect(hdbc));

     /* Free Data Base Connection allocation */
     check("SQLFreeConnect",SQLFreeConnect(hdbc));

     /* Free Environment allocation */
     check("SQLFreeEnv",SQLFreeEnv(henv));

    return 0;
}
A good programming practice is to check the return value after each call
to the ODBC function. In general, the return value can be one of the following:
SQL_SUCCESS SQL_NO_DATA_FOUND SQL_INVALID_HANDLE SQL_NEED_DATA |
SQL_SUCCESS_WITH_INFO SQL_ERROR SQL_STILL_EXECUTING |
The ODBC function call check should involve calling SQLError to retrieve possible additional information.
The test program can be modified to check other SQL commands
or ODBC API function calls.